Tabs API を使う
タブを使うとユーザーはブラウザーウィンドウに複数のウェブページを開いてウェブページ間をスイッチできるようになります。Tabs API により、タブを操作して、新しい方法でタブを使ったり拡張機能の機能として配布できます。
このハウツー記事では次のようなことを見ていきます:
- Tabs API を使うのに必要な権限
- タブについての詳しい探検と
tabs.queryを使ったプロパティ - タブの作成、複製、移動、更新、読み込み、と削除
- タブのズームレベル操作
- タブの CSS 操作
その次には、API で提供されるその他のいろいろな機能を見て終わります。
メモ:
There are some Tab API features covered elsewhere. These are the methods you can use to manipulate tab content with scripts (tabs.connect, tabs.sendMessage, and tabs.executeScript). If you want more information on these methods, see the Concepts article Content scripts and the how-to guide Modify a web page.
権限と Tabs API
Tabs API 機能の大半では権限は不要ですが、次の例外はあります:
- Tab オブジェクトの
Tab.url,Tab.title,Tab.favIconUrlプロパティにアクセスするには"tabs" 権限が必要です。Firefox では、URL の query を実行するのに"tabs"が要ります。 tabs.executeScriptやtabs.insertCSSには Host 権限が必要です。
下記は、拡張機能の manifest.json ファイルで "tabs" 権限を要求する方法です:
"permissions": [
  "<all_urls>",
  "tabs"
],
この要求により、訪問するすべてのウェブサイトですべての Tabs API 機能を使うことができます。また、host 権限不要の tabs.executeScript や tabs.insertCSS を使うのに、"activeTab"の形で権限を要求する別のこの権限は "tabs" に <all_urls> つきのものと同じですが、次の 2 つの制限があります:
- ユーザーは拡張機能のページアクション、コンテキストメニュー、ショートカットキーいずれかでやりとりせねばならない。
- アクティブなタブ内の権限のみ許可される。
このアプローチの利点は、拡張機能が "Access your data for all websites" という警告をユーザーに表示しないことです。これは <all_urls> 権限により、拡張機能がいつでもどんなタブでも実行できるのに対し、"activeTab" では、現在のタブでのユーザーが要求したアクションのみ実行するためです。
タブとそのプロパティの探検
すべてのブラウザーウィンドウのすべてのタブのリストを取得したいときもあるでしょう。ある条件にマッチするタブ、例えば特定のタブから開かれた、あるいはあるドメインのページを表示したもの、のサブセットを発見したいこともあるでしょう。タブのリストを持っていれば、そのプロパティを詳しく知りたくなるでしょう。
これが tabs.query の出てくる場所です。単独で使ってすべてのタブを取得したり、queryInfo オブジェクト—これでタブがアクティブかとか、現在のウィンドウ内かとかといった、17 の条件のいくつかを指定する条件—をつけて、tabs.query はタブの情報を含んだ tabs.Tab オブジェクトの配列を返します。
現在のタブだけの情報が欲しいときは、そのタブの tabs.Tab オブジェクトを tabs.getCurrent を使って取得できます。タブの ID がある場合、tabs.Tab オブジェクトを tabs.get を使って取得できます。
方法の実例
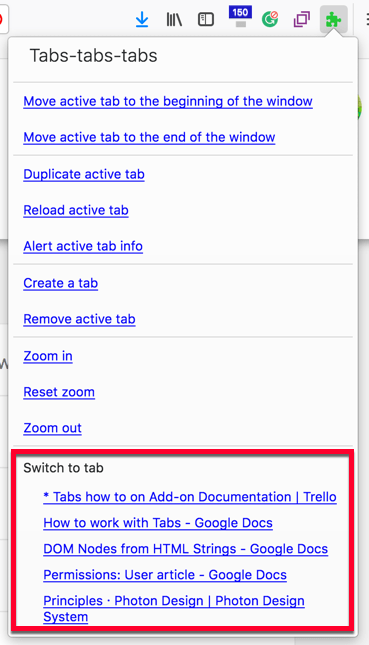
tabs.query と tabs.Tab の使われ方を見るために、tabs-tabs-tabs の例で "switch to tabs" のリストをツールバーボタンのポップアップに追加するのを見てみましょう。
manifest.json
これが manifest.json です:
{
  "browser_action": {
    "browser_style": true,
    "default_title": "Tabs, tabs, tabs",
    "default_popup": "tabs.html"
  },
  "description": "A list of methods you can perform on a tab.",
  "homepage_url": "https://github.com/mdn/webextensions-examples/tree/master/tabs-tabs-tabs",
  "manifest_version": 2,
  "name": "Tabs, tabs, tabs",
  "permissions": ["tabs"],
  "version": "1.0"
}
メモ: 次のことに注意します:
- **tabs.html は
browser_actionのdefault_popupで定義されていること。**これはユーザーが拡張機能のツールバーアイコンをクリックするといつでも表示されます。 - **権限にタブが入っていること。**これはタブリスト機能をサポートするのに必要であり、なぜなら拡張機能がポップアップに表示するためにタブのタイトルを読み取るためです。
tabs.html
tabs.html では拡張機能のポップアップのコンテンツを定義します。
<!doctype html>

<html>
  <head>
    <meta charset="utf-8" />
    <link rel="stylesheet" href="tabs.css" />
  </head>

  <body>
    <div class="panel">
      <div class="panel-section panel-section-header">
        <div class="text-section-header">Tabs-tabs-tabs</div>
      </div>

      <a href="#" id="tabs-move-beginning"
        >Move active tab to the beginning of the window</a
      ><br />

      … Define the other menu items …

      <div class="switch-tabs">
        <p>Switch to tab</p>

        <div id="tabs-list"></div>
      </div>
    </div>

    <script src="tabs.js"></script>
  </body>
</html>
上記のまとめとして:
- メニュー項目が定義されます。
- タブのリストを入れるため、ID が
tabs-listの空のdivが定義されます。 - tabs.js が呼ばれます。
tabs.js
tabs.js では、タブのリストが作られて、ポップアップに追加される方法を見ていきましょう。
ポップアップの作成
まず、tabs.html が読み込まれたとき、listTabs() を実行するイベントハンドラーを追加します。:
document.addEventListener("DOMContentLoaded", listTabs);
listTabs() は最初に getCurrentWindowTabs() を呼び出します。ここで現在のウィンドウ内のタブの tabs.Tab オブジェクトを取得するのにtabs.query が使われます:
function getCurrentWindowTabs() {
  return browser.tabs.query({ currentWindow: true });
}
今度は、ポップアップのコンテンツを作成するために ListTabs() が準備できています。
開始するには:
tabs-listdivを取得。- 文書のフラグメントを作成 (ここにリストが作成される)。
- カウンターをセット。
tabs-listdivのコンテンツをクリアする。
function listTabs() {
 getCurrentWindowTabs().then((tabs) => {
    let tabsList = document.getElementById('tabs-list');
    let currentTabs = document.createDocumentFragment();
    let limit = 5;
    let counter = 0;

    tabsList.textContent = '';
次に、それぞれのタブのリンクを作ります:
tabs.Tabオブジェクトからの最初の 5 項目でループする。- 各項目ごとに、文書のフラグメントのハイパーリンクを追加する。
- リンクのラベル—つまり、そのテキスト—が、タブのタイトル (ない場合はその ID)を使って、セットされる
- タブの ID を使ってリンクのアドレスがセットされる。
for (let tab of tabs) {
  if (!tab.active && counter <= limit) {
    let tabLink = document.createElement("a");

    tabLink.textContent = tab.title || tab.id;

    tabLink.setAttribute("href", tab.id);
    tabLink.classList.add("switch-tabs");
    currentTabs.appendChild(tabLink);
  }

  counter += 1;
}
最後に、tabs-list div に文書のフラグメントが書き込まれる:
    tabsList.appendChild(currentTabs);
  });
}
アクティブタブを操作する
関連するもう 1 つの例として、"Alert active tab" インフォオプションがあり、これはアクティブなタブのすべての tabs.Tab オブジェクトのプロパティをアラートにダンプするものです:
 else if (e.target.id === "tabs-alertinfo") {
   callOnActiveTab((tab) => {
     let props = "";
     for (let item in tab) {
       props += `${ item } = ${ tab[item] } \n`;
     }
     alert(props);
   });
 }
callOnActiveTab() では、アクティブなセットを求めて tabs.Tab オブジェクトをループすることで、アクティブなタブを探します:
document.addEventListener("click", function(e) {
 function callOnActiveTab(callback) {
   getCurrentWindowTabs().then((tabs) => {
     for (var tab of tabs) {
       if (tab.active) {
         callback(tab, tabs);
       }
     }
   });
 }
}
タブを作成、複製、移動、更新、読み込み、削除する
Having gathered information about the tabs you'll most likely want to do something with them—either to offer users features for manipulating and managing tabs or to implement functionality in your extension.
The following functions are available:
- create a new tab (
tabs.create). - duplicate a tab (
tabs.duplicate). - remove a tab (
tabs.remove). - move a tab (
tabs.move). - update the tab's URL—effectively browse to a new page—(
tabs.update). - reload the tab's page (
tabs.reload).
メモ:
These functions all require the ID (or IDs) of the tab they are manipulating:
Whereas the following functions will act on the active tab (if no tab ID is provided):
方法の実例
The tabs-tabs-tabs example exercises all of these features except for updating a tab's URL The way in which these APIs are used is similar, so we'll look at one of the more involved implementations, that of the "Move active tab to the beginning of the window list" option.
But first, here is a demonstration of the feature in action:
manifest.json
None of the functions require a permission to operate, so there are no features in the manifest.json file that need to be highlighted.
tabs.html
tabs.html defines the "menu" displayed in the popup, which includes the "Move active tab to the beginning of the window list" option, with a series of <a> tags grouped by a visual separator. Each menu item is given an ID, which is used in tabs.js to determine which menu item is being requested.
<a href="#" id="tabs-move-beginning"
  >Move active tab to the beginning of the window</a
><br />
<a href="#" id="tabs-move-end">Move active tab to the end of the window</a
><br />

<div class="panel-section-separator"></div>

<a href="#" id="tabs-duplicate">Duplicate active tab</a><br />

<a href="#" id="tabs-reload">Reload active tab</a><br />
<a href="#" id="tabs-alertinfo">Alert active tab info</a><br />
tabs.js
To implement the "menu" defined in tabs.html, tabs.js includes a listener for clicks in tabs.html:
document.addEventListener("click", function(e) {
 function callOnActiveTab(callback) {

   getCurrentWindowTabs().then((tabs) => {
     for (var tab of tabs) {
       if (tab.active) {
         callback(tab, tabs);
       }
     }
   });
}
}
A series of if statements then look to match the ID of the item clicked.
This code snippet is for the "Move active tab to the beginning of the window list" option:
if (e.target.id === "tabs-move-beginning") {
  callOnActiveTab((tab, tabs) => {
    var index = 0;
    if (!tab.pinned) {
      index = firstUnpinnedTab(tabs);
    }
    console.log(`moving ${tab.id} to ${index}`);
    browser.tabs.move([tab.id], { index });
  });
}
It's worth noting the use of console.log(). This enables you to output information to the debugger console, which can be useful when resolving issues found during development.
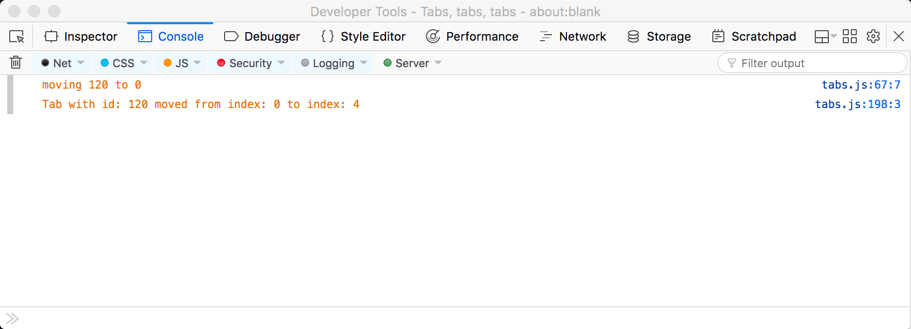
The move code first calls callOnActiveTab() which in turn calls getCurrentWindowTabs() to get a tabs.Tab object containing the active window's tabs. It then loops through the object to find and return the active tab object:
function callOnActiveTab(callback) {
  getCurrentWindowTabs().then((tabs) => {
    for (var tab of tabs) {
      if (tab.active) {
        callback(tab, tabs);
      }
    }
  });
}
ピン止めされたタブ
A feature of tabs is that the user can pin tabs in a window. Pinned tabs are placed at the start of the tab list and cannot be moved. This means that the earliest position a tab can move to is the first position after any pinned tabs. So, firstUnpinnedTab() is called to find the position of the first unpinned tab by looping through the tabs object:
function firstUnpinnedTab(tabs) {
  for (var tab of tabs) {
    if (!tab.pinned) {
      return tab.index;
    }
  }
}
We now have everything needed to move the tab: the active tab object from which we can get the tab ID and the position the tab is to be moved to. So, we can implement the move:
browser.tabs.move([tab.id], { index });
The remaining functions to duplicate, reload, create, and remove tabs are implemented similarly.
タブのズームレベルを操作する
The next set of functions enable you to get (tabs.getZoom) and set (tabs.setZoom) the zoom level within a tab. You can also retrieve the zoom settings (tabs.getZoomSettings) but, at the time of writing, the ability to set the settings (tabs.setZoomSettings) wasn't available in Firefox.
The level of zoom can be between 30% and 300% (represented as decimals 0.3 to 3).
In Firefox the default zoom settings are:
- default zoom level: 100%.
- zoom mode: automatic (so the browser manages how zoom levels are set).
- scope of zoom changes:
"per-origin", meaning that when you visit a site again, it takes the zoom level set in your last visit.
方法の実例
The tabs-tabs-tabs example includes three demonstrations of the zoom feature: zoom in, zoom out, and reset zoom. Here is the feature in action:
Let's take a look at how the zoom in is implemented.
manifest.json
None of the zoom functions require permissions, so there are no features in the manifest.json file that need to be highlighted.
tabs.html
We have already discussed how the tabs.html defines the options for this extension, nothing new or unique is done to provide the zoom options.
tabs.js
tabs.js starts by defining several constants used in the zoom code:
const ZOOM_INCREMENT = 0.2;
const MAX_ZOOM = 3;
const MIN_ZOOM = 0.3;
const DEFAULT_ZOOM = 1;
It then uses the same listener we discussed earlier so it can act on clicks in tabs.html.
For the zoom in feature, this runs:
 else if (e.target.id === "tabs-add-zoom") {
   callOnActiveTab((tab) => {
     var gettingZoom = browser.tabs.getZoom(tab.id);
     gettingZoom.then((zoomFactor) => {
       //the maximum zoomFactor is 3, it can't go higher
       if (zoomFactor >= MAX_ZOOM) {
         alert("Tab zoom factor is already at max!");
       } else {
         var newZoomFactor = zoomFactor + ZOOM_INCREMENT;
         //if the newZoomFactor is set to higher than the max accepted
         //it won't change, and will never alert that it's at maximum
         newZoomFactor = newZoomFactor > MAX_ZOOM ? MAX_ZOOM : newZoomFactor;
         browser.tabs.setZoom(tab.id, newZoomFactor);
       }
     });
   });
 }
This code uses callOnActiveTab() to get the details of the active tab, then tabs.getZoom gets the tab's current zoom factor. The current zoom is compared to the defined maximum (MAX_ZOOM) and an alert issued if the tab is already at the maximum zoom. Otherwise, the zoom level is incremented but limited to the maximum zoom, then the zoom is set with tabs.getZoom.
タブの CSS を操作する
Another significant capability offered by the Tabs API is the ability to manipulate the CSS within a tab—add new CSS to a tab (tabs.insertCSS) or remove CSS from a tab (tabs.removeCSS).
This can be useful, 例えば、 if you want to highlight certain page elements or change the default layout of the page.
方法の実例
The apply-css example uses these features to add a red border to the web page in the active tab. Here is the feature in action:
Let's walk through how it's set up.
manifest.json
To use the CSS features you need either:
"tabs"permission and host permission or"activeTab"permission.
The latter is the most useful, as it allows an extension to use tabs.insertCSS and tabs.removeCSS in the active tab when run from the extension's browser or page action, context menu, or a shortcut.
{
  "description": "Adds a page action to toggle applying CSS to pages.",

  "manifest_version": 2,
  "name": "apply-css",
  "version": "1.0",
  "homepage_url": "https://github.com/mdn/webextensions-examples/tree/master/apply-css",

  "background": {
    "scripts": ["background.js"]
  },

  "page_action": {
    "default_icon": "icons/off.svg",
    "browser_style": true
  },

  "permissions": ["activeTab", "tabs"]
}
You will note that "tabs" permission is requested in addition to "activeTab". This additional permission is needed to enable the extension's script to access the tab's URL, the importance of which we'll see in a moment.
The other main features in the manifest.json file are the definition of:
- a background script, which starts running as soon as the extension is loaded.
- a "page action", which defines an icon to be added to the browser's address bar.
background.js
On startup, background.js sets some constants to define the CSS to be applied, titles for the "page action", and a list of protocols the extension will work in:
const CSS = "body { border: 20px solid red; }";
const TITLE_APPLY = "Apply CSS";
const TITLE_REMOVE = "Remove CSS";
const APPLICABLE_PROTOCOLS = ["http:", "https:"];
When first loaded, the extension uses tabs.query to get a list of all the tabs in the current browser window. It then loops through the tabs calling initializePageAction().
var gettingAllTabs = browser.tabs.query({});

gettingAllTabs.then((tabs) => {
  for (let tab of tabs) {
    initializePageAction(tab);
  }
});
initializePageAction uses protocolIsApplicable() to determine whether the active tab's URL is one the CSS can be applied to:
function protocolIsApplicable(url) {
  var anchor = document.createElement("a");
  anchor.href = url;
  return APPLICABLE_PROTOCOLS.includes(anchor.protocol);
}
Then, if the example can act on the tab, initializePageAction() sets the tab's pageAction (navigation bar) icon and title to use the "off" versions before making the pageAction visible:
function initializePageAction(tab) {
  if (protocolIsApplicable(tab.url)) {
    browser.pageAction.setIcon({ tabId: tab.id, path: "icons/off.svg" });
    browser.pageAction.setTitle({ tabId: tab.id, title: TITLE_APPLY });
    browser.pageAction.show(tab.id);
  }
}
Next, a listener on pageAction.onClicked waits for the pageAction icon to be clicked, and calls toggleCSS when it is.
browser.pageAction.onClicked.addListener(toggleCSS);
toggleCSS() gets the title of the pageAction and then takes the action described:
-
For "Apply CSS":
- toggles the
pageActionicon and title to the "remove" versions. - applies the CSS using
tabs.insertCSS.
- toggles the
-
For "Remove CSS":
- toggles the
pageActionicon and title to the "apply" versions. - removes the CSS using
tabs.removeCSS.
- toggles the
function toggleCSS(tab) {
  function gotTitle(title) {
    if (title === TITLE_APPLY) {
      browser.pageAction.setIcon({ tabId: tab.id, path: "icons/on.svg" });
      browser.pageAction.setTitle({ tabId: tab.id, title: TITLE_REMOVE });
      browser.tabs.insertCSS({ code: CSS });
    } else {
      browser.pageAction.setIcon({ tabId: tab.id, path: "icons/off.svg" });
      browser.pageAction.setTitle({ tabId: tab.id, title: TITLE_APPLY });
      browser.tabs.removeCSS({ code: CSS });
    }
  }

  var gettingTitle = browser.pageAction.getTitle({ tabId: tab.id });

  gettingTitle.then(gotTitle);
}
Finally, to ensure that the pageAction is valid after each update to the tab, a listener on tabs.onUpdated calls initializePageAction() each time the tab is updated to check that the tab is still using a protocol to which the CSS can be applied.
browser.tabs.onUpdated.addListener((id, changeInfo, tab) => {
  initializePageAction(tab);
});
その他の興味深い機能
There are a couple of other Tabs API features that don't fit into one of the earlier sections:
- Capture the visible tab content with
tabs.captureVisibleTab. - Detect the primary language of the content in a tab using
tabs.detectLanguage. This could be used, 例えば、to match the language in your extension's UI with that of the page it's running in.
関連項目
If you want to learn more about the Tabs API, check out:
- Tabs API reference
- Example extensions (many of which use the Tabs API)