Сторонние API
API, которые мы рассмотрели до сих пор, встроены в браузер, но не все API таковы. Многие крупные веб-сайты и сервисы, такие как Google Maps, Twitter, Facebook, PayPal и т. д., Предоставляют API-интерфейсы, позволяющие разработчикам использовать свои данные (например, показывать ваш твиттер-поток в вашем блоге) или сервисы (например, отображение пользовательских карт Google на вашем сайте, или использование логина Facebook для входа в систему ваших пользователей). В этой статье рассматривается различие между API-интерфейсами браузера и сторонними API и показано типичное использование последних.
| Необходимые условия: | Основы JavaScript (см. первые шаги, структурные элементы, объекты JavaScript), the основы клиентских API |
|---|---|
| Задача: | Изучить, как работают сторонние API, и как использовать их для улучшения ваших сайтов. |
Что такое сторонние API?
Сторонние API - это API, предоставляемые третьими лицами — как правило, такими компаниями, как Facebook, Twitter, or Google — чтобы вы могли получить доступ к их функциям с помощью JavaScript и использовать его на своём собственном сайте. Как мы показали в нашей вводной статье об API, одним из наиболее очевидных примеров является использование Google Maps APIs для отображения пользовательских карт на ваших страницах.
Давайте снова посмотрим на наш пример карты (см. исходный код на GitHub; см. это в действии), и используем его для иллюстрации того, как сторонние API отличаются от API-интерфейсов браузера.
Примечание: Возможно вы захотите сразу получить все наши примеры кода, в этом случае вы можете просто искать репозиторий с файлами примеров, которые вам нужны в каждом разделе.
Они находятся на сторонних серверах
API браузера встроены в браузер - вы можете получить к ним доступ сразу из JavaScript. Например, API геолокации, доступный в нашем примере, осуществляется с использованием свойства геолокации объекта Navigator, которое возвращает объект Geolocation. Этот пример использует метод getCurrentPosition() этого объекта, для запроса текущего положения устройства:
navigator.geolocation.getCurrentPosition(function(position) { ... });
Сторонние API, с другой стороны, расположены на сторонних серверах. Чтобы получить доступ к ним из JavaScript, вам сначала нужно подключиться к функциям API и сделать его доступным на вашей странице. Обычно это связано с первой ссылкой на библиотеку JavaScript, доступную на сервере через элемент <script>, как показано в нашем примере:
<script
  type="text/javascript"
  src="https://maps.google.com/maps/api/js?key=AIzaSyDDuGt0E5IEGkcE6ZfrKfUtE9Ko_de66pA"></script>
Затем вы можете начать использовать объекты, доступные в этой библиотеке. Например:
var latlng = new google.maps.LatLng(
  position.coords.latitude,
  position.coords.longitude,
);
var myOptions = {
  zoom: 8,
  center: latlng,
  mapTypeId: google.maps.MapTypeId.TERRAIN,
  disableDefaultUI: true,
};

var map = new google.maps.Map(document.getElementById("map_canvas"), myOptions);
Здесь мы создаём новый объект LatLng, используя конструктор google.maps.LatLng(), который содержит широту и долготу местоположения, которое мы хотим показать, полученные из API геолокации. Затем мы создаём объект опций (myOptions), содержащий эту и другую информацию, связанную с отображением карты. Наконец, мы фактически создаём карту, используя конструктор google.maps.Map(), который принимает в качестве параметров элемент, на котором мы хотим нарисовать карту, и объект опций.
Это вся информация, которую API Карт Google требует для построения простой карты. Сервер, к которому вы подключаетесь, обрабатывает все сложные вещи, такие как отображение правильных фрагментов карты для отображаемой области и т. д.
Примечание: Некоторые API обрабатывают доступ к их функциям несколько иначе, требуя от разработчика сделать HTTP-запрос (см. Получение данных с сервера) на определённый шаблон URL для получения определённых данных. Они называются RESTful API, и мы покажем пример этого позже в статье.
Разрешения обрабатываются по-разному
Безопасность API-интерфейсов браузеров, как правило, обрабатывается запросами разрешения, как описано в нашей первой статье. Целью этого является то, что пользователь знает, что происходит на сайтах, которые он посещает, и с меньшей вероятностью может стать жертвой того, кто использует API, злонамеренно.
Сторонние API имеют немного другую систему разрешений - они, как правило, используют ключевые коды, чтобы позволить разработчикам получить доступ к функциям API. Просмотрите URL-адрес библиотеки API Карт Google, с которой мы связались:
https://maps.google.com/maps/api/js?key=AIzaSyDDuGt0E5IEGkcE6ZfrKfUtE9Ko_de66pA
Параметр URL, указанный в конце URL-адреса, является ключом разработчика - разработчик приложения должен применять его для получения ключа, а затем включать его в свой код определённым образом, чтобы иметь доступ к функциям API. В случае с Картами Google (и другими API Google) вы подаёте заявку на получение ключа на Google Cloud Platform.
Другие API могут потребовать, чтобы вы включили ключ немного по-другому, но шаблон для большинства из них довольно схож.
Требование к ключу заключается в том, что не каждый может использовать функциональность API без какой-либо подотчётности. Когда разработчик зарегистрировался для ключа, они затем известны поставщику API, и действие может быть предпринято, если они начинают делать что-то вредоносное с помощью API (например, отслеживать местоположение пользователей или пытаться спамить API с множеством запросов для остановки его работы, например). Самое простое действие - просто отменить их привилегии API.
Расширенный пример Карт Google
Теперь когда мы рассмотрели пример API Карт Google и посмотрели, как он работает, добавим ещё несколько функций, чтобы показать, как использовать некоторые другие функции API.
-
Чтобы начать этот раздел, сделайте себе копию исходного файла Карт Google, в новой папке. Если вы уже клонировали репозиторий примеров, у вас уже есть копия этого файла, которую вы можете найти в папке the javascript/apis/third-party-apis/google-maps.
-
Затем получите свой собственный ключ разработчика, выполнив следующие шаги:
- Перейдите в панель управления API-интерфейсом Google Cloud Platform.
- Создайте новый проект, если у вас его ещё нет.
- Нажмите кнопку Enable API.
- Выберите Google Maps JavaScript API.
- Нажмите кнопку Enable.
- Нажмите Create credentials, затем выберите API key.
- Скопируйте свой ключ API и замените существующий ключ в первом элементе
<script>примера вашим собственным (фрагмент между?key=и меткой закрытия закрытия атрибута (").)
-
Откройте исходный файл Карт Google, найдите строку
INSERT-YOUR-API-KEY-HERE, и замените её фактическим ключом API, который вы получили из панели управления Google Cloud Platform API Manager.
Adding a custom marker
Adding a marker (icon) at a certain point on the map is easy — you just need to create a new marker using the google.maps.Marker() constructor, passing it an options object containing the position to display the marker at (as a LatLng object), and the Map object to display it on.
-
Add the following just below the
var map ...line:jsvar marker = new google.maps.Marker({ position: latlng, map: map, });Now if you refresh your page, you'll see a nice little marker pop up in the centre of the map. This is cool, but it is not exactly a custom marker — it is using the default marker icon.
-
To use a custom icon, we need to specify it when we create the marker, using its URL. First of all, add the following line above the previous block you added:
jsvar iconBase = "https://maps.google.com/mapfiles/kml/shapes/";This defines the base URL where all the official Google Maps icons are stored (you could also specify your own icon location if you wished).
-
The icon location is specified in the
iconproperty of the options object. Update the constructor like so:jsvar marker = new google.maps.Marker({ position: latlng, icon: iconBase + "flag_maps.png", map: map, });Here we specify the icon property value as the
iconBaseplus the icon filename, to create the complete URL. Now try reloading your example and you'll see a custom marker displayed on your map!
Примечание: See Customizing a Google Map: Custom Markers for more information.
Примечание: See Map marker or Icon names to find out what other icons are available, and see what their reference names are. Their file name will be the icon name they display when you click on them, with ".png" added on the end.
Displaying a popup when the marker is clicked
Another common use case for Google Maps is displaying more information about a place when its name or marker is clicked (popups are called info windows in the Google Maps API). This is also very simple to achieve, so let's have a look at it.
-
First of all, you need to specify a JavaScript string containing HTML that will define the content of the popup. This will be injected into the popup by the API and can contain just about any content you want. Add the following line below the
google.maps.Marker()constructor definition:jsvar contentString = '<div id="content"><h2 id="firstHeading" class="firstHeading">Custom info window</h2><p>This is a cool custom info window.</p></div>'; -
Next, you need to create a new info window object using the
google.maps.InfoWindow()constructor. Add the following below your previous line:jsvar infowindow = new google.maps.InfoWindow({ content: contentString, });There are other properties available (see Info Windows), but here we are just specifying the
contentproperty in the options object, which points to the source of the content. -
Finally, to get the popup to display when the marker is clicked, we use a simple click event handler. Add the following below the
google.maps.InfoWindow()constructor:jsmarker.addListener("click", function () { infowindow.open(map, marker); });Inside the function, we simply invoke the infowindow's
open()function, which takes as parameters the map you want to display it on, and the marker you want it to appear next to. -
Now try reloading the example, and clicking on the marker!
Controlling what map controls are displayed
Inside the original google.maps.Map() constructor, you'll see the property disableDefaultUI: true specified. This disables all the standard UI controls you usually get on Google Maps.
-
Try setting its value to
false(or just removing the line altogether) then reloading your example, and you'll see the map zoom buttons, scale indicator, etc. -
Now undo your last change.
-
You can show or hide the controls in a more granular fashion by using other properties that specify single UI features. Try adding the following underneath the
disableDefaultUI: true(remember to put a comma afterdisableDefaultUI: true, otherwise you'll get an error):jszoomControl: true, mapTypeControl: true, scaleControl: true, -
Now try reloading the example to see the effect these properties have. You can find more options to experiment with at the MapOptions object reference page.
That's it for now — have a look around the Google Maps APIs documentation, and have some more fun playing!
A RESTful API — NYTimes
Now let's look at another API example — the New York Times API. This API allows you to retrieve New York Times news story information and display it on your site. This type of API is known as a RESTful API — instead of getting data using the features of a JavaScript library like we did with Google Maps, we get data by making HTTP requests to specific URLs, with data like search terms and other properties encoded in the URL (often as URL parameters). This is a common pattern you'll encounter with APIs.
An approach for using third-party APIs
Below we'll take you through an exercise to show you how to use the NYTimes API, which also provides a more general set of steps to follow that you can use as an approach for working with new APIs.
Find the documentation
When you want to use a third party API, it is essential to find out where the documentation is, so you can find out what features the API has, how you use them, etc. The New York Times API documentation is at https://developer.nytimes.com/.
Get a developer key
Most APIs require you to use some kind of developer key, for reasons of security and accountability. To sign up for an NYTimes API key, you need to go to https://developer.nytimes.com/signup.
- Let's request a key for the "Article Search API" — fill in the form, selecting this as the API you want to use.
- Next, wait a few minutes, then get the key from your email.
- Now, to start the example off, make copies of nytimes_start.html and nytimes.css in a new directory on your computer. If you've already cloned the examples repository, you'll already have a copy of these files, which you can find in the javascript/apis/third-party-apis/nytimes directory. Initially the
<script>element contains a number of variables needed for the setup of the example; below we'll fill in the required functionality.
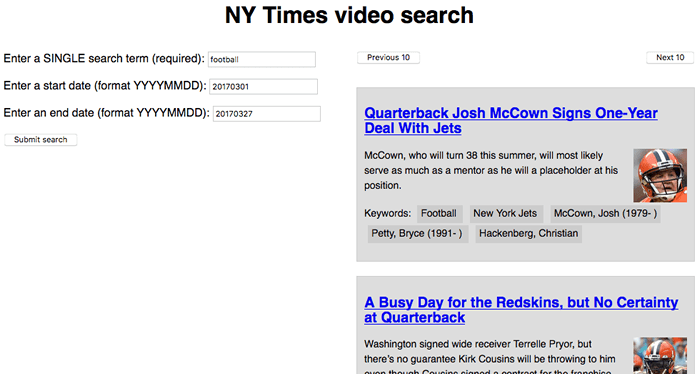
The app will end up allowing you to type in a search term and optional start and end dates, which it will then use to query the Article Search API and display the search results.
Connect the API to your app
First, you'll need to make a connection between the API, and your app. This is usually done either by connecting to the API's JavaScript (as we did in the Google Maps API), or by making requests to the correct URL(s).
In the case of this API, you need to include the API key as a get parameter every time you request data from it.
-
Find the following line:
jsvar key = "INSERT-YOUR-API-KEY-HERE";Replace
INSERT-YOUR-API-KEY-HEREwith the actual API key you got in the previous section. -
Add the following line to your JavaScript, below the "
// Event listeners to control the functionality" comment. This runs a function calledfetchResults()when the form is submitted (the button is pressed).jssearchForm.addEventListener("submit", submitSearch); -
Now add the
submitSearch()andfetchResults()function definitions, below the previous line:jsfunction submitSearch(e) { pageNumber = 0; fetchResults(e); } function fetchResults(e) { // Use preventDefault() to stop the form submitting e.preventDefault(); // Assemble the full URL url = baseURL + "?api-key=" + key + "&page=" + pageNumber + "&q=" + searchTerm.value + '&fq=document_type:("article")'; if (startDate.value !== "") { url += "&begin_date=" + startDate.value; } if (endDate.value !== "") { url += "&end_date=" + endDate.value; } }
submitSearch() sets the page number back to 0 to begin with, then calls fetchResults(). This first calls preventDefault() on the event object, to stop the form actually submitting (which would break the example). Next, we use some string manipulation to assemble the full URL that we will make the request to. We start off by assembling the parts we deem as mandatory for this demo:
- The base URL (taken from the
baseURLvariable). - The API key, which has to be specified in the
api-keyURL parameter (the value is taken from thekeyvariable). - The page number, which has to be specified in the
pageURL parameter (the value is taken from thepageNumbervariable). - The search term, which has to be specified in the
qURL parameter (the value is taken from the value of thesearchTermtext<input>). - The document type to return results for, as specified in an expression passed in via the
fqURL parameter. In this case, we just want to return articles.
Next, we use a couple of if() statements to check whether the startDate and endDate <input>s have had values filled in on them. If they do, we append their values to the URL, specified in begin_date and end_date URL parameters respectively.
So, a complete URL would end up looking something like this:
https://api.nytimes.com/svc/search/v2/articlesearch.json?api-key=4f3c267e125943d79b0a3e679f608a78&page=0&q=cats
&fq=document_type:("article")&begin_date=20170301&end_date=20170312
Примечание: You can find more details of what URL parameters can be included in the Article Search API reference.
Примечание:
The example has rudimentary form data validation — the search term field has to be filled in before the form can be submitted (achieved using the required attribute), and the date fields have pattern attributes specified, which means they won't submit unless their values consist of 8 numbers (pattern="[0-9]{8}"). See Form data validation for more details on how these work.
Requesting data from the API
Now we've constructed our URL, let's make a request to it. We'll do this using the Fetch API.
Add the following code block inside the fetchResults() function, just above the closing curly brace:
// Use fetch() to make the request to the API
fetch(url)
  .then(function (result) {
    return result.json();
  })
  .then(function (json) {
    displayResults(json);
  });
Here we run the request by passing our url variable to fetch(), convert the response body to JSON using the json() function, then pass the resulting JSON to the displayResults() function so the data can be displayed in our UI.
Displaying the data
OK, let's look at how we'll display the data. Add the following function below your fetchResults() function.
function displayResults(json) {
  while (section.firstChild) {
    section.removeChild(section.firstChild);
  }

  var articles = json.response.docs;

  if (articles.length === 10) {
    nav.style.display = "block";
  } else {
    nav.style.display = "none";
  }

  if (articles.length === 0) {
    var para = document.createElement("p");
    para.textContent = "No results returned.";
    section.appendChild(para);
  } else {
    for (var i = 0; i < articles.length; i++) {
      var article = document.createElement("article");
      var heading = document.createElement("h2");
      var link = document.createElement("a");
      var img = document.createElement("img");
      var para1 = document.createElement("p");
      var para2 = document.createElement("p");
      var clearfix = document.createElement("div");

      var current = articles[i];
      console.log(current);

      link.href = current.web_url;
      link.textContent = current.headline.main;
      para1.textContent = current.snippet;
      para2.textContent = "Keywords: ";
      for (var j = 0; j < current.keywords.length; j++) {
        var span = document.createElement("span");
        span.textContent += current.keywords[j].value + " ";
        para2.appendChild(span);
      }

      if (current.multimedia.length > 0) {
        img.src = "http://www.nytimes.com/" + current.multimedia[0].url;
        img.alt = current.headline.main;
      }

      clearfix.setAttribute("class", "clearfix");

      article.appendChild(heading);
      heading.appendChild(link);
      article.appendChild(img);
      article.appendChild(para1);
      article.appendChild(para2);
      article.appendChild(clearfix);
      section.appendChild(article);
    }
  }
}
There's a lot of code here; let's explain it step by step:
- The
whileloop is a common pattern used to delete all of the contents of a DOM element, in this case, the<section>element. We keep checking to see if the<section>has a first child, and if it does, we remove the first child. The loop ends when<section>no longer has any children. - Next, we set the
articlesvariable to equaljson.response.docs— this is the array holding all the objects that represent the articles returned by the search. This is done purely to make the following code a bit simpler. - The first
if()block checks to see if 10 articles are returned (the API returns up to 10 articles at a time.) If so, we display the<nav>that contains the Previous 10/Next 10 pagination buttons. If less than 10 articles are returned, they will all fit on one page, so we don't need to show the pagination buttons. We will wire up the pagination functionality in the next section. - The next
if()block checks to see if no articles are returned. If so, we don't try to display any — we just create a<p>containing the text "No results returned." and insert it into the<section>. - If some articles are returned, we, first of all, create all the elements that we want to use to display each news story, insert the right contents into each one, and then insert them into the DOM at the appropriate places. To work out which properties in the article objects contained the right data to show, we consulted the Article Search API reference. Most of these operations are fairly obvious, but a few are worth calling out:
- We used a for loop (
for(var j = 0; j < current.keywords.length; j++) { ... }) to loop through all the keywords associated with each article, and insert each one inside its own<span>, inside a<p>. This was done to make it easy to style each one. - We used an
if()block (if(current.multimedia.length > 0) { ... }) to check whether each article actually has any images associated with it (some stories don't.) We display the first image only if it actually exists (otherwise an error would be thrown). - We gave our <div> element a class of "clearfix", so we can easily apply clearing to it (this technique is needed at the time of writing to stop floated layouts from breaking.)
- We used a for loop (
If you try the example now, it should work, although the pagination buttons won't work yet.
Wiring up the pagination buttons
To make the pagination buttons work, we will increment (or decrement) the value of the pageNumber variable, and then re-rerun the fetch request with the new value included in the page URL parameter. This works because the NYTimes API only returns 10 results at a time — if more than 10 results are available, it will return the first 10 (0-9) if the page URL parameter is set to 0 (or not included at all — 0 is the default value), the next 10 (10-19) if it is set to 1, and so on.
This allows us to easily write a simplistic pagination function.
-
Below the existing
addEventListener()call, add these two new ones, which cause thenextPage()andpreviousPage()functions to be invoked when the relevant buttons are clicked:jsnextBtn.addEventListener("click", nextPage); previousBtn.addEventListener("click", previousPage); -
Below your previous addition, let's define the two functions — add this code now:
jsfunction nextPage(e) { pageNumber++; fetchResults(e); } function previousPage(e) { if (pageNumber > 0) { pageNumber--; } else { return; } fetchResults(e); }The first function is simple — we increment the
pageNumbervariable, then run thefetchResults()function again to display the next page's results.The second function works nearly exactly the same way in reverse, but we also have to take the extra step of checking that
pageNumberis not already zero before decrementing it — if the fetch request runs with a minuspageURL parameter, it could cause errors. If thepageNumberis already 0, we simplyreturnout of the function, to avoid wasting processing power (If we are already at the first page, we don't need to load the same results again).
YouTube example
We also built another example for you to study and learn from — see our YouTube video search example. This uses two related APIs:
- The YouTube Data API to search for YouTube videos and return results.
- The YouTube IFrame Player API to display the returned video examples inside IFrame video players so you can watch them.
This example is interesting because it shows two related third-party APIs being used together to build an app. The first one is a RESTful API, while the second one works more like Google Maps (with constructors, etc.). It is worth noting however that both of the APIs require a JavaScript library to be applied to the page. The RESTful API has functions available to handle making the HTTP requests and returning the results, so you don't have to write them out yourself using say fetch or XHR.

We are not going to say too much more about this example in the article — the source code has detailed comments inserted inside it to explain how it works.
Summary
This article has given you a useful introduction to using third party APIs to add functionality to your websites.