Express チュートリアル Part 3: データベースの使用 (Mongoose を使用)
この記事ではデータベースと、それらを Node/Express アプリで使用する方法について簡単に紹介します。続いて、Mongoose を使用して地域図書館ウェブサイトへのデータベースアクセスを提供する方法を説明します。 オブジェクトスキーマとモデルの宣言方法、主なフィールド型、および基本的な検証について説明します。また、モデルデータにアクセスするための主な方法についても簡単に説明します。
| 前提条件: | Express チュートリアル Part 2: スケルトンウェブサイトの作成 |
|---|---|
| 目標: | Mongoose を使用して独自のモデルを設計および作成できるようになること。 |
概要
図書館の職員は、地域図書館のウェブサイトを使用して、図書や利用者の情報を管理します。一方、利用者はこのウェブサイトを使用して、図書を閲覧・検索し、利用できる冊数を確認した上で、予約や貸出を行うことができます。情報を効率的に格納するために、データベースに情報を格納します。
Express アプリケーションはさまざまなデータベースを使用できます。作成、読み取り、更新、削除 (CRUD) 操作を実行するために使用できるいくつかのアプローチがあります。 このチュートリアルではいくつかの利用可能なオプションの簡単な概要を説明し、次に選択された特定のメカニズムを詳細に表示します。
どのデータベースを使用できるか
Express アプリは Node でサポートされている任意のデータベースを使用できます (Express 自体はデータベース管理のための特定の追加の動作や要件を定義していません)。 PostgreSQL、MySQL、Redis、SQLite、MongoDB など、多くの一般的な選択肢があります。
データベースを選択するときは、生産性/学習時間の曲線、パフォーマンス、複製/バックアップの容易さ、コスト、コミュニティサポートなどのことを考慮する必要があります。「最高の」データベースは 1 つもありませんが、ほとんどの一般的なソリューションは、地域図書館のような中小規模のサイトでは十分条件を満たしているはずです。
オプションの詳細については、データベース統合 (Express ドキュメント) を参照してください。
データベースを利用するための最良の方法
データベースにインタラクティブにアプローチするには 2 つの方法があります。
- データベースのネイティブクエリー言語 (例:SQL)を使用する
- オブジェクトデータモデル ("ODM")/オブジェクトリレーショナルモデル ("ORM") を使用する。ODM/ORM はウェブサイトのデータを JavaScript オブジェクトとして表し、それが基になるデータベースにマッピングされます。一部の ORM は特定のデータベースに関連付けられていますが、他のデータベースはデータベースに依存しないバックエンドを提供しています
SQL、またはデータベースでサポートされているクエリー言語を使用すると、最高のパフォーマンスが得られます。ODM は、変換コードを使用してオブジェクトとデータベース形式の間のマッピングを行うため、処理が遅くなることが多く、最も効率的なデータベースクエリーが使用されない可能性があります(これは、ODM がさまざまなデータベースバックエンドをサポートしている場合に特に当てはまります。サポートされているデータベース機能に関して、さらに妥協する必要があります)。
ORM を使用する利点は、プログラマがデータベースのセマンティクスではなく JavaScript オブジェクトの観点から考え続けることができることです。これは、同じデータベースまたは異なるウェブサイトで異なるデータベースを扱う必要がある場合に特に当てはまります。またデータの検証とチェックを実行するための明らかな場所を提供します。
メモ: ODM/ORM を使用すると、多くの場合、開発と保守のコストが削減されます。ネイティブのクエリー言語に精通しているかパフォーマンスが最優先であるのでなければ、ODM の使用を積極的に検討するべきです。
どの ORM/ODM を使うべきか
npm パッケージマネージャのサイトには、多数の ODM/ORM ソリューションがあります (サブセットの odm タグおよび orm タグを調べてください)。
執筆時点で一般的だったいくつかの解決策は、次のとおりです。
- Mongoose: Mongoose は、非同期環境で動作するように設計された MongoDB オブジェクトモデリングツールです
- Waterline: Express ベースの Sails ウェブフレームワークから抽出された ORM。Redis、MySQL、LDAP、MongoDB、Postgres など、さまざまなデータベースにアクセスするための統一された API を提供します
- Bookshelf: Promise ベースおよび従来の callback インターフェイスの両方を備え、トランザクションのサポート、熱心な/入れ子になったリレーションの読み込み、多態的な関連付け、および 1 対 1、1 対多、および多対多のリレーションのサポートを提供します。PostgreSQL、MySQL、および SQLite3 で動作します
- Objection: SQL とその基盤となるデータベースエンジン (SQLite 3、Postgres、および MySQL をサポート) の全機能を使用することを可能な限り簡単にします
- Sequelize は Node.js と io.js のための Promise ベースの ORM です。PostgreSQL、MySQL、MariaDB、SQLite、および MSSQL のダイアレクトをサポートし、堅実なトランザクションサポート、リレーション、リードレプリケーションなどを備えています
- Node ORM2 は NodeJS のオブジェクトリレーションマネージャです。MySQL、SQLite、Progres をサポートし、オブジェクト指向のアプローチを使用してデータベースを操作するのを助けます
- GraphQL: 主に RESTful API 向けの問い合わせ言語である GraphQL は、とても人気があり、データベースからデータを取得するための機能も持っています。
原則として、解決策を選択する際には、提供されている機能と「コミュニティ活動」(ダウンロード、協力、バグ報告、ドキュメントの品質など)の両方を考慮する必要があります。この記事を書いている時点では、Mongoose は最も人気のある ODM であり、データベースに MongoDB を使用している場合は妥当な選択です。
地域図書館で Mongoose と MongoDB を使用する
地域図書館の例(およびこのトピックの残りの部分)では、Mongoose ODM を使用してライブラリーデータにアクセスします。Mongoose は、文書指向のデータモデルを使用するオープンソースの NoSQL データベースである MongoDB のフロントエンドとして機能します。MongoDB データベースの "文書" の "コレクション" は、リレーショナルデータベースの "行" の "テーブル" に似ています。
この ODM とデータベースの組み合わせは、Node コミュニティで非常に人気があります。これは、文書の保存とクエリーのシステムが JSON に非常に似ているため、JavaScript 開発者にはよく知られているためです。
メモ: Tip: Mongoose を使用するために MongoDB を知っている必要はありませんが、Mongoose のドキュメントの一部は、MongoDB に慣れている方が使いやすく理解しやすいものです。
このチュートリアルの残りの部分では、地域図書館ウェブサイトの例の Mongoose スキーマとモデルを定義してアクセスする方法を示します。
地域図書館モデルの設計
いきなりモデルのコーディングを始める前に、格納する必要があるデータと、さまざまなオブジェクト間の関係について検討することをお勧めします。
書籍に関する情報 (タイトル、概要、著者、ジャンル、ISBN) を保存する必要があること、および複数のコピーが利用可能であること (グローバルに一意の ID、利用状況など) があることを知っています。著者の名前だけではなく、著者に関するより多くの情報を格納する必要があるかもしれません。また、同じ名前または類似の名前を持つ著者が複数いる可能性があります。書籍のタイトル、著者、ジャンル、およびカテゴリーに基づいて情報を並べ替えることができるようにします。
モデルを設計するときは、すべての "オブジェクト" (関連情報のグループ) ごとに別々のモデルを用意するのが合理的です。 この場合、明らかなオブジェクトは本、本のインスタンス、および作者です。
ウェブサイト自体に選択肢をハードコーディングするのではなく、モデルを使用して選択肢の選択肢 (たとえば選択肢のドロップダウンリストなど) を表すこともできます - すべてのオプションが事前にわかっていない場合や変更される可能性がある場合は、これをお勧めします。このタイプのモデルの明らかな候補は本のジャンルです (例:サイエンスフィクション、フランス詩など)。
モデルとフィールドを決めたら、それらの関係について考える必要があります。
そのことを念頭に置いて、以下の UML 関連図は、この場合に定義するモデルを (ボックスとして) 示しています。上記で説明したように、本のモデル (本の一般的な詳細)、本のインスタンス (システムで利用可能な本の特定の物理コピーのステータス)、および作成者のモデルを作成しました。また、値を動的に作成できるように、ジャンルのモデルを用意することにしました。BookInstance:status のモデルを使用しないことにしました - 許容値は変更しないと考えられるので、許容値をハードコードします。各ボックス内には、モデル名、フィールド名と型、そしてメソッドとその戻り型が表示されます。
この図には、モデル間の関係 (それらの多重度も含む) も示されています。多重度は、関係内に存在する可能性がある各モデルの番号 (最大および最小) を示す図上の番号です。たとえば、ボックス間の接続線は、Book と Genre が関連していることを示しています。Book モデルに近い数字は、ジャンルに 0 個以上の Book がある必要があることを示しており、線のもう一方の端にあるGenre の隣の数字は、本に 0 個以上の関連するGenreがあることを示しています。
メモ:
下記の Mongoose 入門で説明されているように、1 つのモデルだけで documents/models 間の関係を定義するフィールドがあるほうがよいでしょう (他のモデルで関連する _id を検索することによって逆の関係を見つけることができます)。以下では、Book スキーマの Book/Genre と Book/Author の関係、および BookInstance スキーマの Book/BookInstance の関係を定義します。この選択は多少恣意的でした - 他のスキーマでも同じようにフィールドを持つことができました。

メモ: 次の節では、モデルの定義方法と使用方法を説明する基本的な入門書を提供します。お読みになったところで、上の図の各モデルをどのように構築するかを検討してください。
データベース API は非同期である
レコードの生成、検索、更新、削除を行うデータベースメソッドは非同期です。 つまり、これらのメソッドは即座に返却され、メソッドの成功または失敗を処理するコードは、操作が完成した後の時点で実行されます。 サーバーがデータベースの操作の完了を待機している間も、それ以外にもコードを実行できるため、サーバーは他のリクエストに対して応答性を維持することができます。
JavaScriptには、非同期動作に対応する仕組みがいくつかあります。 かつてJavaScriptでは、成功時やエラー時の処理を行うために、非同期メソッドにコールバック関数を渡す方法に強く依存していました。 現行の JavaScript で、コールバックは主にプロミスに置き換えられています。 プロミスは、非同期メソッドによって(即座に)返されるオブジェクトであり、その将来の状態を表します。 操作が完了すると、プロミスオブジェクトは「決定」され、操作の結果またはエラーを表すオブジェクトを解決します。
プロミスが解決された際にコードを実行するためにプロミスを使用する主な方法は 2 つあります。両方の手法の概要については、プロミスの使い方をぜひお読みになることを強くお勧めします。
このチュートリアルでは、主に await を使用して、async function 内でプロミスの完了を待ちます。これにより、より読み取り可能で理解しやすい非同期コードが得られるためです。
この手法の仕組みは、async function キーワードを使用して関数を非同期としてマークし、その関数内でプロミスを返すメソッドに対して await を適用するというものです。
非同期関数が実行されると、その操作は最初の await メソッドで一時停止し、プロミスが解決するまで待機します。
周囲のコードから見ると、非同期関数はそこで返り、その後のコードが実行可能になります。
その後、プロミスが解決されると、非同期関数内の await メソッドは結果を返します。プロミスが拒否された場合は、エラーが発生します。
その後、非同期関数内のコードは、次の await に遭遇して再び一時停止するか、関数内のすべてのコードが実行されるまで実行されます。
下記の例で、これがどのように動作するかを確認できます。
myFunction() は、try...catch ブロック内で呼び出される非同期関数です。
myFunction() が実行されると、コードの実行は methodThatReturnsPromise() で一時停止し、プロミスが解決されるまで待つます。プロミスが解決されると、コードは functionThatReturnsPromise() へと続け、再び待つます。
非同期関数内でエラーが発生した場合、catch ブロック内のコードが実行されます。これは、いずれかのメソッドから返されたプロミスが拒否された場合に現れます。
async function myFunction() {
  // …
  await someObject.methodThatReturnsPromise();
  // …
  await functionThatReturnsPromise();
  // …
}

try {
  // …
  myFunction();
  // …
} catch (e) {
  // error handling code
}
以上の非同期メソッドは、順番に実行されます。
メソッド同士に依存関係がない場合は、それらを並列に実行することで、操作全体をより迅速に完了させることができます。
これを行うには、Promise.all() メソッドを使用します。このメソッドは、プロミスの反復可能オブジェクトを引数として受け取り、単一の Promise を返します。
この返されたプロミスは、入力のすべてのプロミスが履行された時点で履行され、履行値の配列を返します。
入力のいずれかのプロミスが拒否された場合、その最初の拒否理由をつけて拒否されます。
下記コードは、その仕組みを示しています。
まず、プロミスを返す 2 つの関数があります。
Promise.all() によって返されたプロミスを使用して、両方の関数が完了するのを await で待ちます。
両方が完了すると、await が返され、結果の配列が設定されます。
その後、関数は次の await を続け、anotherFunctionThatReturnsPromise() によって返されたプロミスが決定されるまで待ちます。
エラーを捕捉するために、myFunction() は try...catch ブロック内で呼び出すようにしてください。
async function myFunction() {
  // …
  const [resultFunction1, resultFunction2] = await Promise.all([
    functionThatReturnsPromise1(),
    functionThatReturnsPromise2(),
  ]);
  // …
  await anotherFunctionThatReturnsPromise(resultFunction1);
}
await/async をつけてプロミスを使えば、非同期実行を柔軟かつ「理解しやすい」形で制御することができます。
Mongoose 入門
このセクションでは、Mongoose を MongoDB データベースに接続する方法、スキーマとモデルを定義する方法、そして基本的なクエリーを作成する方法の概要を説明します。
メモ: この入門書は、npm の Mongoose クイックスタートと公式ドキュメントに "大きく影響を受けています"。
Mongoose と MongoDB のインストール
Mongoose は他の依存関係と同じようにあなたのプロジェクト (package.json) にインストールされます。つまり NPM を使用します。インストールするには、プロジェクトフォルダー内で次のコマンドを使用します。
npm install mongoose
Mongoose をインストールすると、MongoDB データベースドライバを含むすべての依存関係が追加されますが、MongoDB 自体はインストールされません。 MongoDB サーバーをインストールする場合は、さまざまな OS 用のインストーラーをここからダウンロードしてローカルにインストールできます。クラウドベースの MongoDB インスタンスを使用することもできます。
メモ: このチュートリアルでは、データベースとして MongoDB Atlas のクラウド型 Database as a Service の無料プランを使用します。これは開発に適しており、OS に依存しない「インストール」環境を実現できるため、このチュートリアルには最適です(Database as a Service は、本番環境のデータベースとして採用する手法の一つでもあります)。
MongoDB への接続
Mongoose を使用するには、MongoDB データベースへの接続が必要です。
下記に示すように、require() を使用して、mongoose.connect() を通じてローカルでホストされているデータベースに接続することができます(このチュートリアルでは、代わりにインターネット上でホストされているデータベースに接続します)。
// mongoose モジュールをインポート
const mongoose = require("mongoose");

// 接続するデータベースの URL を定義
const mongoDB = "mongodb://127.0.0.1/my_database";

// データベースへの接続が完了するまで待ち、問題がある場合はエラーをログ出力
main().catch((err) => console.log(err));
async function main() {
  await mongoose.connect(mongoDB);
}
メモ:
データベース API は非同期であるの節でディスカッションしたように、ここでは async 関数内で connect() メソッドから返されるプロミスを await しています。
接続時に発生するエラーを処理するためにプロミスの catch() ハンドラーを使用していますが、try...catch ブロック内で main() を呼び出してもよかったでしょう。
デフォルトの Connection オブジェクトは、mongoose.connection で取得できます。
追加の接続を作成する必要がある場合は、mongoose.createConnection() を使用することができます。
これは connect() と同じ形式のデータベース URI(ホスト、データベース、ポート、オプションなど)を受け取り、Connection オブジェクトを返します。
なお、createConnection()は即座に返ります。接続が確立されるまで待機する必要がある場合は、asPromise()をつけて呼び出すことで、プロミスを返すことができます (mongoose.createConnection(mongoDB).asPromise())。
モデルの定義と作成
モデルは Schema インターフェイスを使用して定義されます。スキーマを使用すると、各文書に格納されているフィールドとその検証要件およびデフォルト値を定義できます。さらに、データ型や他のフィールドと同じように使用できるが実際にはデータベースに格納されていない仮想プロパティも扱いやすいように、静的メソッドおよびインスタンスヘルパーメソッドを定義できます(もう少し後で説明します)。
その後、スキーマは mongoose.model() メソッドを使用してモデルに "コンパイル" されます。モデルを作成したら、それを使用して特定のタイプのオブジェクトを検索、作成、更新、および削除できます。
メモ:
各モデルは MongoDB データベース内の文書のコレクションにマップされます。文書はモデル Schema で定義されたフィールド/スキーマタイプを含みます。
スキーマの定義
以下のコードは、単純なスキーマを定義する方法を示しています。最初に mongoose を require() し、次に Schema コンストラクターを使用して新しいスキーマインスタンスを作成し、コンストラクターの object 引数で内部のさまざまなフィールドを定義します。
// Require Mongoose
const mongoose = require("mongoose");

// スキーマを定義
const Schema = mongoose.Schema;

const SomeModelSchema = new Schema({
  a_string: String,
  a_date: Date,
});
上記の場合、文字列と日付の 2 つのフィールドしかありません。次のセクションでは、他のフィールドタイプ、検証、その他の方法について説明します。
モデルを作成する
モデルは、mongoose.model() メソッドを使用してスキーマから作成されます。
// スキーマを定義
const Schema = mongoose.Schema;

const SomeModelSchema = new Schema({
  a_string: String,
  a_date: Date,
});

// スキーマからモデルをコンパイル
const SomeModel = mongoose.model("SomeModel", SomeModelSchema);
最初の引数はあなたのモデル用に作成されるコレクションの単数形の名前です (Mongoose は上記の SomeModel モデル用のデータベースコレクションを作成します)、そして 2 番目の引数はモデルの作成に使用したいスキーマです。
メモ: モデルクラスを定義したら、それらを使用してレコードを作成、更新、または削除し、クエリーを実行してすべてのレコードまたは特定のレコードのサブセットを取得できます。これを行う方法をモデルの使用の節で、そしてビューを作成するときに示します。
スキーマ型 (フィールド)
スキーマには任意の数のフィールドを含めることができます。それぞれのフィールドは、MongoDB に格納されたドキュメント内のフィールドを表します。 一般的なフィールド型の多くと、それらの宣言方法を示したスキーマの例を下記に示します。
const schema = new Schema({
  name: String,
  binary: Buffer,
  living: Boolean,
  updated: { type: Date, default: Date.now() },
  age: { type: Number, min: 18, max: 65, required: true },
  mixed: Schema.Types.Mixed,
  _someId: Schema.Types.ObjectId,
  array: [],
  ofString: [String], // その他の型についても、それぞれ配列を持つことができる。
  nested: { stuff: { type: String, lowercase: true, trim: true } },
});
SchemaTypes のほとんど("type:" の後やフィールド名の後に続く記述子)は、その意味が自明です。例外は以下の通りです。
ObjectId: データベース内のモデルの特定のインスタンスを表します。例えば、書籍データでは、作成者のオブジェクトを表すためにこれを使用することがあります。実際には、指定されたオブジェクトの一意の ID (_id) が含まれます。必要に応じて、populate()メソッドを使用して関連付けられた情報を取得することができます。Mixed: 任意のスキーム型。[]: アイテムの配列。このモデルには JavaScript の配列操作(push, pop, unshift, その他。)を行うことができます。上記の例は特別な型なしにStringオブジェクトの配列を示しています。また、他の型のオブジェクトに対しても配列で持つことはできます。
このコードはフィールドを宣言する 2 つのやり方も示しています。
- フィールド name と type をキーと値の組として指定します(つまり、フィールド
name、binary、livingの場合と同様です)。 - フィールド name の後に、
typeを定義するオブジェクト、およびそのフィールドに対するその他の options が続きます。オプションには、同様に次のようなものがあります。- デフォルト値。
- 組み込みのバリデーター(例:最大値/最小値)および独自の検証関数。
- フィールドが要求されるかどうか
Stringフィールドを自動的に小文字、大文字、先頭・末尾の空白を除去した形式に設定するかどうか(例:{ type: String, lowercase: true, trim: true })
オプションの情報については、SchemaTypes(Mongoose ドキュメント)をご覧ください。
検証
Mongooseには、組み込みのバリデーターや独自のバリデーター、同期型および非同期型のバリデーターが用意されています。すべての場合で、受け入れられる値の範囲と、検証に失敗した際のエラーメッセージの両方を指定することができます。
組み込みのバリデータには、
- すべての SchemaTypes に required があります。 これは文書を保存するために必要なフィールドを指定するために使われます。
- Numbers に min(最小値を指定) と max(最大値を指定) バリデーターがあります。
- Strings には次のものがあります。
以下の例(Mongoose ドキュメントから少し変更しています)では、いくつかのバリデーター型とエラーメッセージを指定する方法を示しています。
const breakfastSchema = new Schema({
  eggs: {
    type: Number,
    min: [6, "Too few eggs"],
    max: 12,
    required: [true, "Why no eggs?"],
  },
  drink: {
    type: String,
    enum: ["Coffee", "Tea", "Water"],
  },
});
詳しくは Validation (Mongoose docs) を見てみてください。
仮想プロパティ
仮想プロパティとは、取得や設定は可能ですが、MongoDB には永続化されないドキュメントのプロパティのことです。ゲッターはフィールドの書式化や結合に役立ち、セッターは単一の値を複数の値に分解して保存するのに役立ちます。ドキュメントの例では、名前と姓のフィールドから「フルネーム」という仮想プロパティを作成(および分解)していますが、これはテンプレート内でフルネームを使用するたびに毎回作成するよりも、簡単で整理された方法となります。
メモ:
ライブラリー内の仮想プロパティを使用し、パスとレコードの _id 値を用いて、それぞれのモデルレコードに固有の URL を定義します。
情報については、Virtuals(Mongoose ドキュメント)をご覧ください。
メソッドとクエリーヘルパー
スキーマは同時に、インスタンスメソッド、静的メソッド、クエリーヘルパーを持つことができます。インスタンスメソッドと静的メソッドは似ていますが、インスタンスメソッドは具体的なレコードに関連付けられ、現在のオブジェクトにアクセスできるという点で明らかな違いがあります。クエリヘルパーを使用すると、Mongooseのチェーン可能なクエリビルダー APIを拡張することができます(例えば、find()、findOne()、findById() メソッドに加えて、"byName" というクエリーを追加することができる)。
モデルの使用
スキーマを作成したら、それを使用してモデルを作成できます。モデルは、データベース内の文書の集合を表し、検索を行うことができます。一方、モデルのインスタンスは個々の文書を表し、保存や取得を行うことができます。
下記に概要を簡単にご提供します。詳細の情報については、Models(Mongooseのドキュメント)をご覧ください。
メモ:
レコードの作成、更新、削除、およびクエリーは、プロミス を返す非同期操作です。
下記の例では、関連するメソッドと await の使用法のみを表示しています(つまり、メソッドを使用するために不可欠なコードです)。
わかりやすくするため、外側の async function およびエラーを捕捉するための try...catch ブロックは除外しています。
await/async の使用に関する情報については、上記のデータベース API は非同期であるをご覧ください。
文書の作成と変更
レコードを生成するには、モデルのインスタンスを定義し、そのインスタンスに対して save() を呼び出します。
下記では、SomeModel が、スキーマから作成したモデル(name という単一のフィールドを持つ)であると仮定しています。
// モデル SomeModel のインスタンスを作成
const awesome_instance = new SomeModel({ name: "awesome" });

// 新しいモデルインスタンスを非同期で保存
await awesome_instance.save();
また、create() を使用することができます。モデルを保存すると同時にインスタンスを定義することもできます。
下記では 1 つだけ作成していますが、オブジェクトの配列を渡すことで複数のインスタンスを作成することも可能です。
await SomeModel.create({ name: "also_awesome" });
すべてのモデルには関連付けられた接続があります(mongoose.model() を使用する場合、これがデフォルトの接続となります)。新しい接続を作成し、その接続に対して .model() を呼び出すことで、別のデータベース上にドキュメントを生成できます。
ドット構文を使用してこの新しいレコードのフィールドにアクセスし、値を変更することができます。変更した値をデータベースに保存するには、save() または update() を呼び出す必要があります。
// ドット表記を使用してモデルフィールドの値にアクセス
console.log(awesome_instance.name); // 'also_awesome' とログ出力

// フィールドを変更してレコードを更新し、その後 save() を呼び出してください。
awesome_instance.name = "New cool name";
await awesome_instance.save();
レコードの検索
照会メソッドを使用して、照会条件をJSONドキュメントとして指定することで、レコードを検索することができます。下記コード例は、データベース内のテニス選手をすべて検索し、選手の name および age フィールドのみを返す方法を示しています。ここでは一致するフィールド (sport) を 1 つだけ指定していますが、条件を追加したり、正規表現による条件を指定したり、あるいは条件をすべて除去してすべての選手を返すことも可能です。
const Athlete = mongoose.model("Athlete", yourSchema);

// テニスをするすべての選手を探し、「名前」と「年齢」のフィールドを返す
const tennisPlayers = await Athlete.find(
  { sport: "Tennis" },
  "name age",
).exec();
メモ: 検索で結果が見つからないことは、検索そのものとしてはエラーではありませんが、アプリケーションのコンテキストにおいて失敗の場合があることを覚えておくことが重要です。 アプリケーションが検索によって値が見つかることを想定している場合は、結果として返される項目の数を調べることができます。
find() などのクエリ API は、Query 型の変数を返します。
クエリオブジェクトを使用すると、exec() メソッドで実行する前に、クエリを段階的に構築することができます。
exec() はクエリを実行し、結果を await できるプロミスを返します。
// テニスをする選手をすべて探す
const query = Athlete.find({ sport: "Tennis" });

// 「名前」と「年齢」のフィールドを選択
query.select("name age");

// 結果を 5 アイテムに制限
query.limit(5);

// 年齢順に並べる
query.sort({ age: -1 });

// 後でクエリーを実行する時点を決める
query.exec();
以上では、find() メソッド内でクエリー条件を定義しました。これと同じことは、where() 関数を使って行うこともでき、クエリの各部分を別個に追加するのではなく、ドット演算子 (.) を使って連結することも可能です。
下記コード断片は、以上のクエリーと同じですが、年齢に関する条件が追加されています。
Athlete.find()
  .where("sport")
  .equals("Tennis")
  .where("age")
  .gt(17)
  .lt(50) // Additional where query
  .limit(5)
  .sort({ age: -1 })
  .select("name age")
  .exec();
find() メソッドは、条件に一致するすべてのレコードを取得しますが、多くの場合、一致するレコードを1件だけ取得したいことがあります。以下のメソッドは、単一のレコードを検索します。
findById(): 指定されたidを持つドキュメントを検索します(すべてのドキュメントには固有のidが付与されています)。findOne(): 指定された条件に一致する単一のドキュメントを検索します。findByIdAndDelete()、findByIdAndUpdate()、findOneAndRemove()、findOneAndUpdate():idまたは条件に基づいて単一のドキュメントを探し、更新または除去します。これらは、レコードの更新や除去を行う際に有益な関数です。
メモ:
また、条件に一致するアイテムの数を取得するために使用できる countDocuments() メソッドもあります。これは、実際にレコードを取得せずに件数を数えたい場合に便利です。
クエリーでは、他にもさまざまなことが可能です。情報については、クエリー (Mongoose ドキュメント) をご覧ください。
関連文書と一緒に作業する — データセット
ObjectId スキーマフィールドを使用すると、あるドキュメント/モデルインスタンスから別のドキュメント/モデルインスタンスへの参照を作成できます。また、ObjectId の配列を使用すれば、1つのドキュメントから複数のドキュメントへの参照を作成することも可能です。このフィールドには、関連するモデルのIDが格納されます。関連付けられたドキュメントの実際のコンテンツが必要な場合は、クエリー内で populate() メソッドを使用することで、IDを実際のデータに置き換えることができます。
例えば、以下のスキーマでは、作成者と記事を定義しています。
それぞれの作成者は複数の記事を保有し、これは ObjectId の配列として表されます。
それぞれの記事は、単一の作成者を持つことができます。
ref プロパティは、このフィールドにどのモデルを代入することができるかをスキーマに指示します。
const mongoose = require("mongoose");

const Schema = mongoose.Schema;

const authorSchema = new Schema({
  name: String,
  stories: [{ type: Schema.Types.ObjectId, ref: "Story" }],
});

const storySchema = new Schema({
  author: { type: Schema.Types.ObjectId, ref: "Author" },
  title: String,
});

const Story = mongoose.model("Story", storySchema);
const Author = mongoose.model("Author", authorSchema);
関連する文書への参照は、_id の値を代入することで保存できます。
下記では、まず作成者を作成し、次にストーリーを作成し、そのストーリーの author フィールドに作成者のIDを代入します。
const bob = new Author({ name: "Bob Smith" });

await bob.save();

// ボブができたので、物語を作成してみましょう
const story = new Story({
  title: "Bob goes sledding",
  author: bob._id, // 作成者 Bob の id を割り当てます。この ID はデフォルトで作成されます!
});

await story.save();
メモ:
このプログラミングスタイルの好ましいことは、コードのメインフローをエラーチェックで複雑にする必要がないことです。
save() 操作のいずれかが失敗した場合、プロミスは拒否され、エラーが発生します。
エラー処理コードはそれを別個に処理するため(通常は catch() ブロック内)、コードの意図がとても明確になります。
ストーリー文書には、現在、著者の文書の ID によって参照される著者が設定されています。ストーリーの結果から著者情報を取得するには、下記に示すように populate() を使用します。
Story.findOne({ title: "Bob goes sledding" })
  .populate("author") // 検索結果内の作成者 ID を実際の作成者情報に置き換える
  .exec();
メモ:
鋭い読者の皆様ならお気づきかと思いますが、ストーリーに作成者を追加したものの、その作成者の stories 配列にストーリーを追加する処理は行っていません。では、具体的な作成者のすべてのストーリーを取得するにはどうすればよいでしょうか?一つの方法は、ストーリーを stories 配列に追加することですが、これでは作成者とストーリーを関連付ける情報を 2 か所で管理することになってしまいます。
より良い方法は、author の _id を取得し、find() を使用してすべてのストーリーの author フィールドからこれを探すことです。
Story.find({ author: bob._id }).exec();
このチュートリアルにおいて、関連アイテムの扱い方について知っておく必要があることは、ほぼこれだけです。より詳しい情報については、Population(Mongoose ドキュメント)をご覧ください。
ファイルあたり 1 つの schema/model
スキーマやモデルは、お好みのファイル構造で作成することも可能ですが、それぞれのモデルのスキーマを個別のモジュール(ファイル)に定義し、モデルを生成するメソッドをエクスポートすることを強くお勧めします。 その例を下記に示します。
// File: ./models/some-model.js

// Require Mongoose
const mongoose = require("mongoose");

// Define a schema
const Schema = mongoose.Schema;

const SomeModelSchema = new Schema({
  a_string: String,
  a_date: Date,
});

// Export function to create "SomeModel" model class
module.exports = mongoose.model("SomeModel", SomeModelSchema);
You can then require and use the model immediately in other files. Below we show how you might use it to get all instances of the model.
// Create a SomeModel model just by requiring the module
const SomeModel = require("../models/some-model");

// Use the SomeModel object (model) to find all SomeModel records
const modelInstances = await SomeModel.find().exec();
MongoDB データベースのセットアップ
Mongoose の機能やモデルの設計方法についてある程度理解できた時点で、いよいよ地域図書館ウェブサイトの制作に取り掛かりましょう。まず最初に行うのは、図書館データを保存するために使用する MongoDB データベースの設定です。
このチュートリアルでは、MongoDB Atlas のクラウドホスト型サンドボックスデータベースを使用します。このデータベース階層は冗長性を持たないため、本番環境のウェブサイトには適していませんが、開発やプロトタイプ作成には最適です。ここでこれを使用するのは、無料かつ設定が簡単であることに加え、MongoDB Atlasが人気の Database as a Service プロバイダーであり、本番環境のデータベースとして選べます(執筆時点では、ScaleGrid や Rackspace などがあります)。
メモ: よろしければ、お使いのシステムに適したバイナリーをダウンロードしてインストールすることで、ローカルに MongoDB データベースを設定することも可能です。接続時に指定するデータベースのURLを除き、この記事の残りの手順は同様になります。 Express チュートリアル Part 7: 本番環境への展開では、アプリケーションとデータベースの両方を Railway 上でホスティングしていますが、MongoDB Atlas 上のデータベースを使用しても同様に問題ありません。
まず、MongoDB Atlasでアカウントを作成する必要があります(これは無料で、基本的な連絡先情報を入力し、利用規約に同意するだけで完了します)。 ログインすると、ホーム画面が表示されます。
-
概要の節にある + Create ボタンをクリックします。

-
これにより、Deploy your cluster 画面が開きます。 M0 FREE オプションのテンプレートをクリックします。

-
ページを下にスクロールして、選択可能なさまざまなオプションを確認してください。

- Cluster Name の下で、クラスターの名前を変更できます。
このチュートリアルでは、
Cluster0のままにします。 - Preload sample dataset チェックボックスの選択を解除してください。後で独自のサンプルデータをインポートするためです
- Provider および Region セクションから、任意のプロバイダーと領域を選択してください。領域によって利用可能なプロバイダーが異なります。
- タグはオプションです。ここでは使用しません。
- Create deployment ボタンをクリックしてください(クラスターの作成には数分かかります)。
- Cluster Name の下で、クラスターの名前を変更できます。
このチュートリアルでは、
-
これにより、Security Quickstart セクションが開きます。

-
アプリケーションがデータベースにアクセスするために使用するユーザー名とパスワードを入力します(上記では、新しいログイン "cooluser" を作成しました)。 後で必要となりますので、資格情報をコピーして安全に格納しておくことをお忘れなく。 Create User ボタンをクリックします。
メモ: MongoDB のユーザーパスワードには特殊文字を使用しないでください。mongoose が接続文字列を正しく構文解析できない可能性があります。
-
現在のコンピューターからアクセスすることができるようにするには、Add by current IP address を選択してください
-
IP アドレスフィールドに
0.0.0.0/0を入力し、Add by current IP address ボタンをクリックしてください。 この操作により、MongoDB に、どこからのアクセスも許可したいことを指示します。メモ: データベースやその他のリソースに接続できる IP アドレスを制限することが最善の手法です。ここでは、展開後、リクエストがどこから決まるか分からないため、どこからの接続もすることができるのです。
-
Finish and Close ボタンをクリックしてください。
-
-
次の画面が開きます。Go to Overview ボタンをクリックしてください。

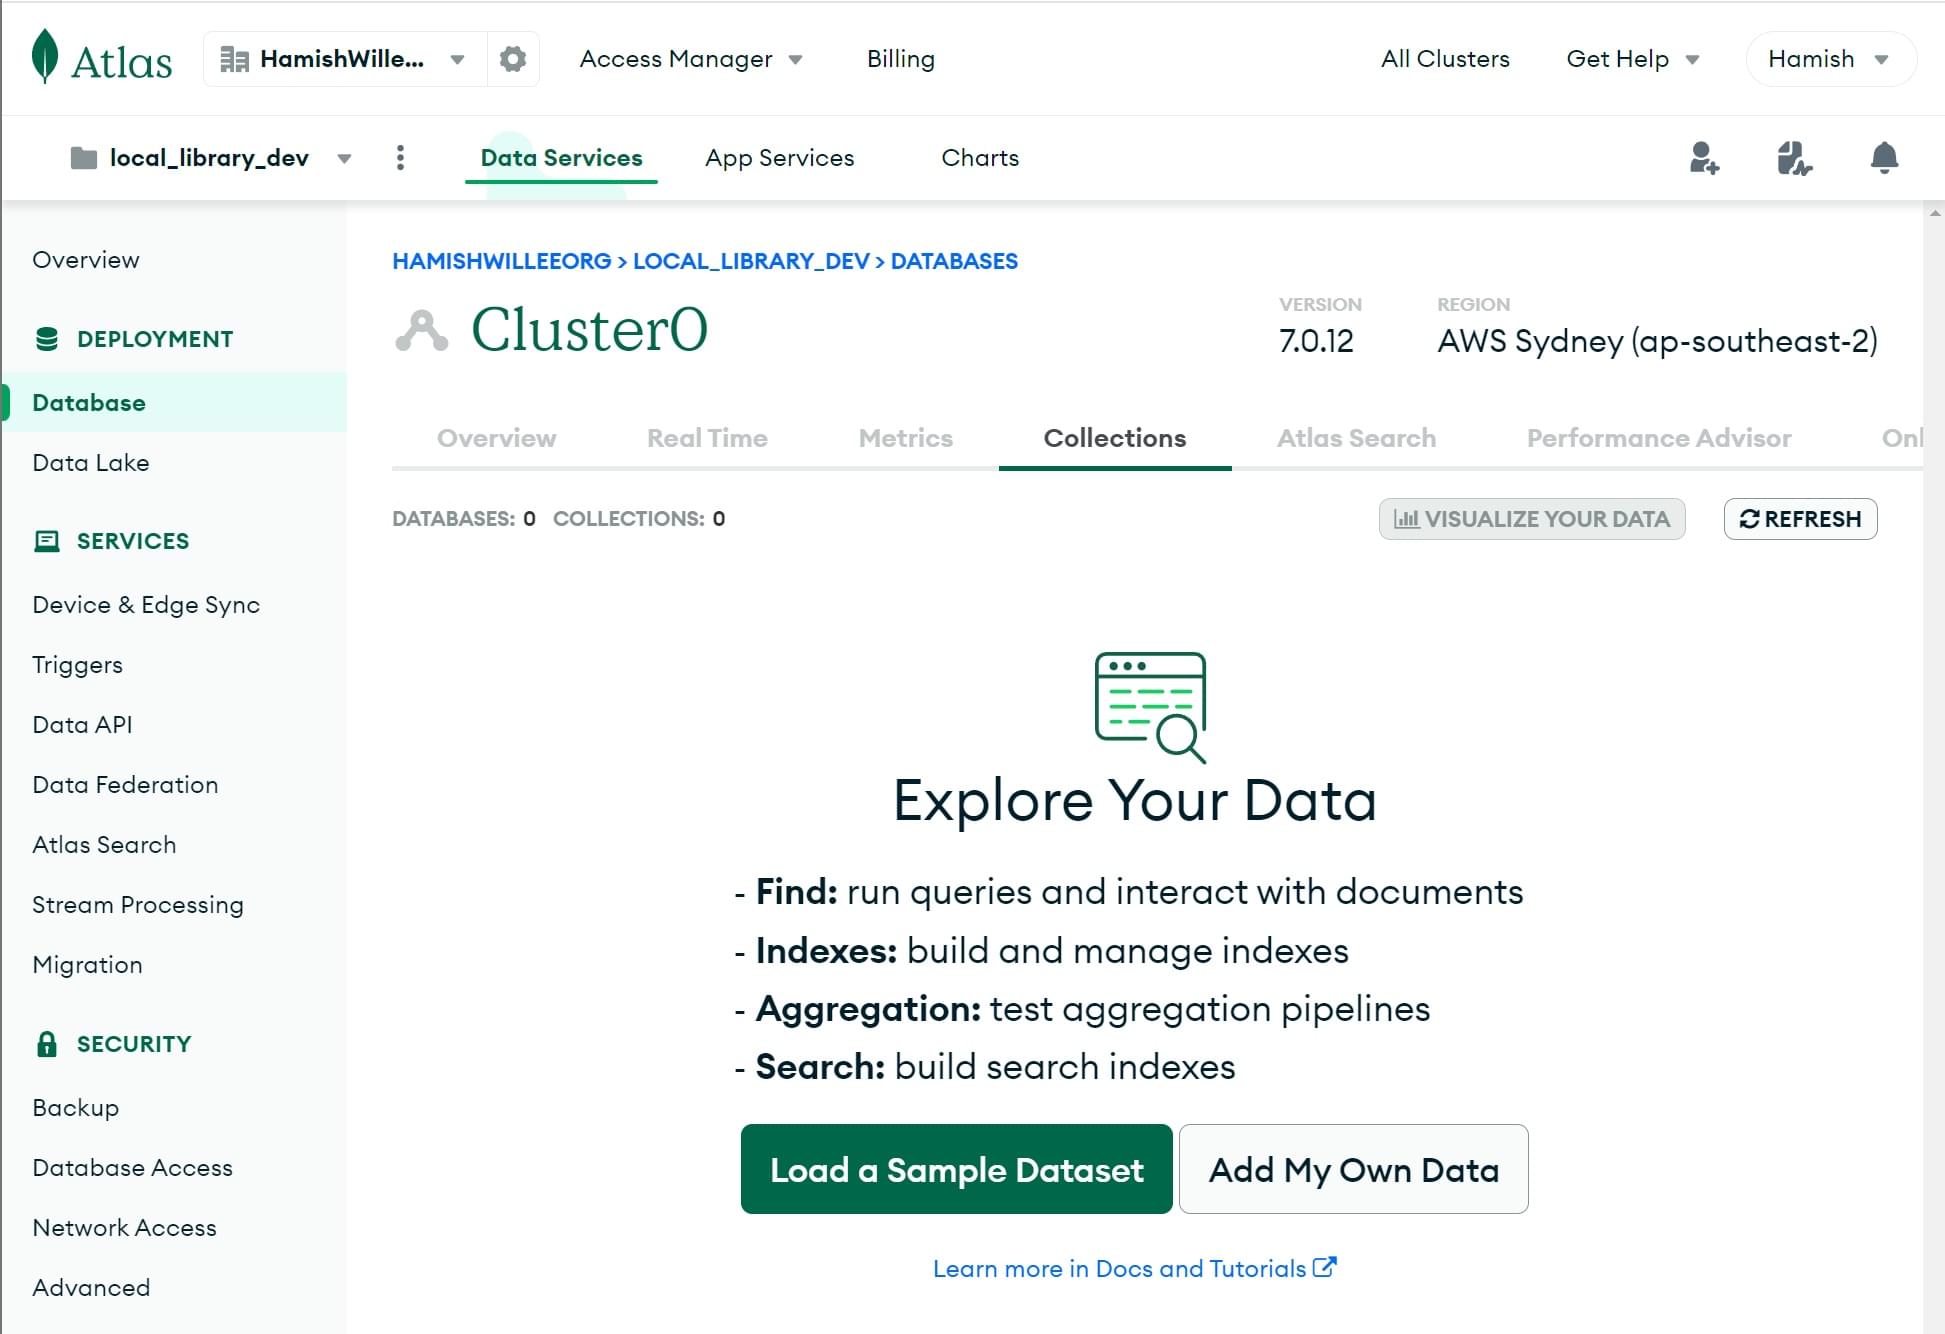
-
Overview 画面に戻ります。左側の Deployment メニューの下にある Database セクションをクリックしてください。 Browse Collections ボタンをクリックしてください。

-
この Collections セクションを開くための手順です。Add My Own Data ボタンをクリックしてください。
-
このコマンドで Create Database 画面が開きます。

- 新しいデータベースの名前として
local_libraryを入力してください。 - 集合の名前として
Collection0を入力してください。 - Create ボタンをクリックして、データベースを作成してください。
- 新しいデータベースの名前として
-
データベースが作成されると、Collections 画面に戻ります。

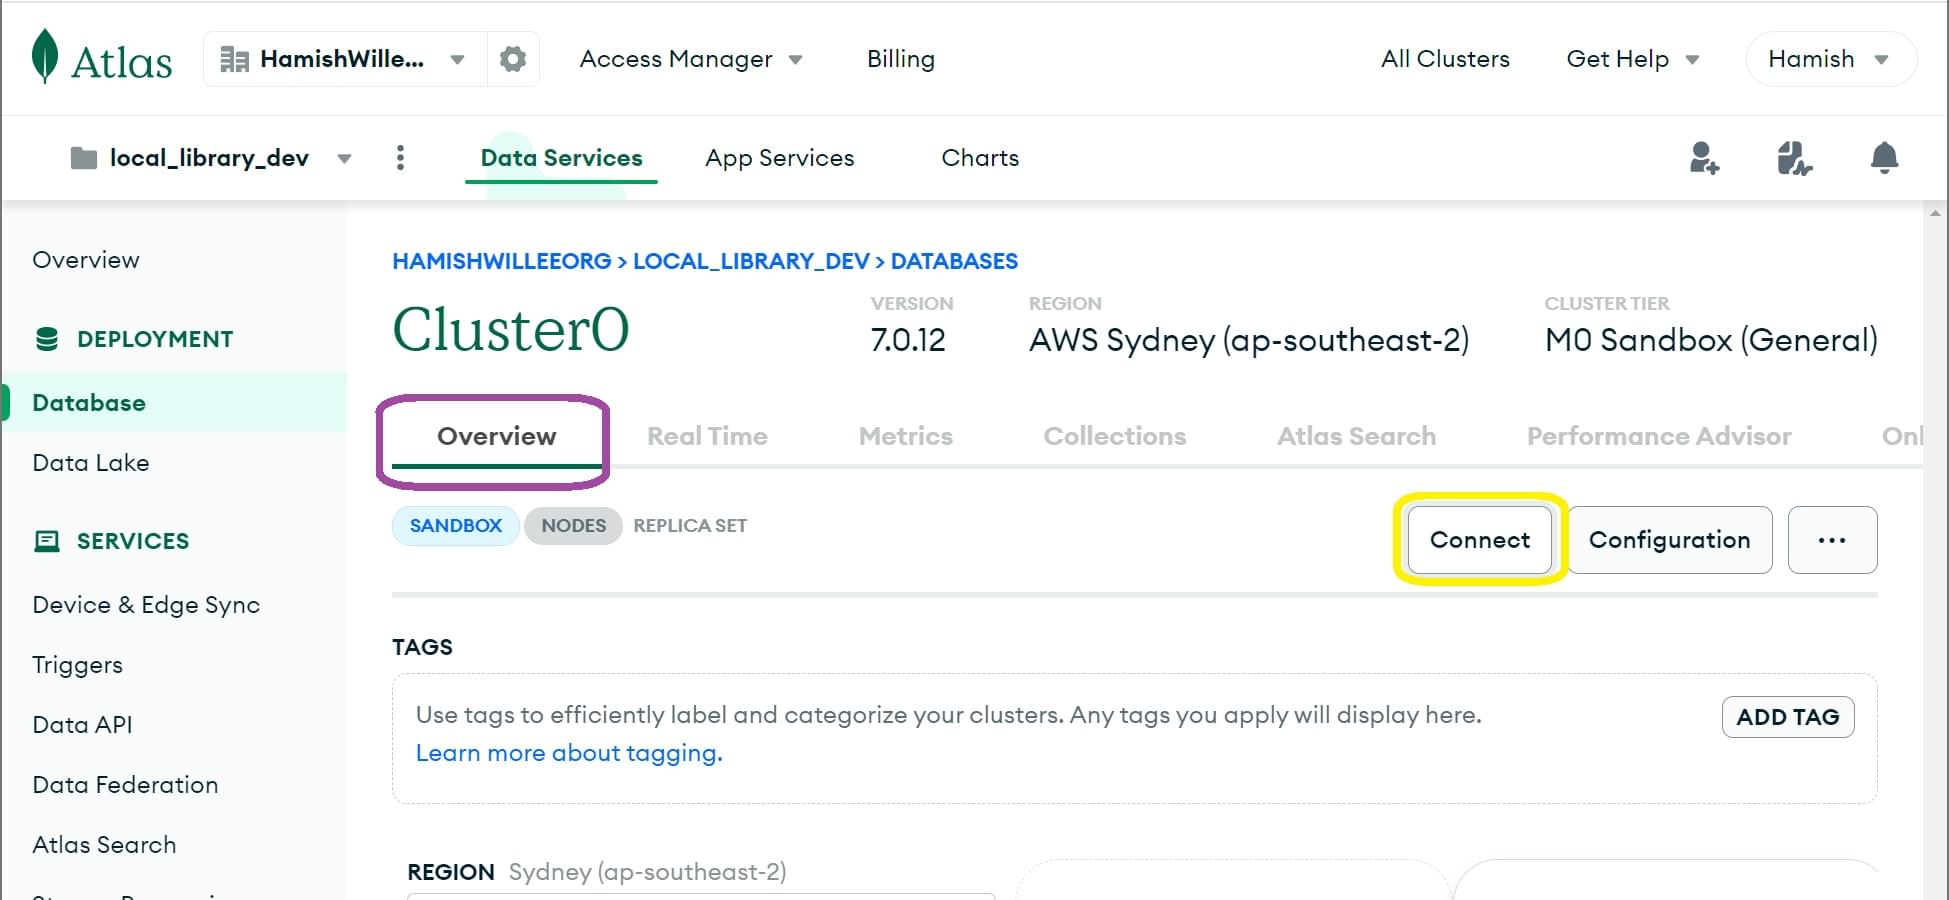
- Overview タブをクリックして、クラスターの概要画面に戻ります。
-
Cluster0 の概要画面で、接続ボタンをクリックしてください。
-
これにより、Connect to Cluster0 のための画面が開きます。

- データベースユーザーを選択してください。
- 図のように、Drivers カテゴリーを選択し、次に Driver の Node.js および Version を選択してください。
- 提案としてドライバーをインストールすることは絶対にしないでください。
- コピー アイコンをクリックして、接続文字列をコピーしてください。
- これをローカルのエディターに貼り付けてください。
- 接続文字列内の
<password>というプレースホルダーを、ご自身のユーザーのパスワードに置き換えてください。 - オプション (
...mongodb.net/local_library?retryWrites...) の前のパスに、データベース名 "local_library" を挿入してください。 - この文字列が含まれているファイルを安全な場所に保存してください。
これでデータベースの作成が完了し、アクセスに利用できる URL(ユーザー名とパスワードを含む)を持つようになりました。
URL は mongodb+srv://your_user_name:your_password@cluster0.cojoign.mongodb.net/local_library?retryWrites=true&w=majority&appName=Cluster0 のような形式になります。
Mongoose のインストール
コマンドプロンプトを開き、ローカルライブラリーのウェブサイト用スケルトンを作成したディレクトリーに移動してください。 以下のコマンドを入力して、Mongoose (およびその依存関係)をインストールし、package.json ファイルに追加してください。ただし、前述の Mongoose 入門 を読み、すでにこの作業を行っている場合は除きます。
npm install mongoose
MongoDB への接続
自分のプロジェクトのルートディレクトリーから bin/www を開き、ポートを設定する箇所(app.set("port", port); の行の後)に下記テキストをコピーしてください。
データベースの URL 文字列 ('insert_your_database_url_here') を、ご自身のデータベースの場所を表す URL(つまり、MongoDB Atlas の情報を使用したもの)に置き換えてください。
// Set up mongoose connection
const mongoose = require("mongoose");

const mongoDB = "insert_your_database_url_here";

async function connectMongoose() {
  await mongoose.connect(mongoDB);

  // Add connection error handlers
  mongoose.connection.on("error", (err) => {
    console.error("MongoDB connection error:", err);
  });

  mongoose.connection.on("disconnected", () => {
    console.warn("MongoDB disconnected");
  });
}

try {
  connectMongoose();
} catch (err) {
  console.error("Failed to connect to MongoDB:", err);
  process.exit(1);
}
上記の Mongoose 入門で説明したように、このコードはデータベースへのデフォルトの接続を生成し、エラーがあればコンソールに出力します。
メモ: データベース接続のコードを app.js に記述することも可能です。 アプリケーションのエントリーポイントに記述することで、アプリケーションとデータベースの結合度が低くなり、テストコードを実行する際に別のデータベースを使用しやすくなります。
なお、以上のようにソースコードにデータベースの資格情報をハードコーディングすることは推奨されません。 ここでは、接続のコアとなるコードを示して、また開発段階では、これらの資格情報が漏洩しても機密情報が公開されたり破損したりする重大なリスクがないため、あえてこのようにしています。 本番環境への展開の際には、この方法がより安全であることを示します!
LocalLibrary スキーマの定義
前述の通り、モデルごとに別個のモジュールを定義します。 まず、プロジェクトのルートディレクトリーにモデル用のフォルダー内 (/models) を作成し、それぞれのモデルごとに別個のファイルを作成します。
/express-locallibrary-tutorial  # the project root
  /models
    author.js
    book.js
    bookinstance.js
    genre.js
Author モデル
下記に示す Author スキーマのコードをコピーし、./models/author.js ファイルに貼り付けてください。
このスキーマでは、作成者を、名前と姓(必須、最大 100 文字)に String スキーマタイプを、生年月日と没年月日に Date フィールドを持つものとして定義しています。
const mongoose = require("mongoose");

const Schema = mongoose.Schema;

const AuthorSchema = new Schema({
  first_name: { type: String, required: true, maxLength: 100 },
  family_name: { type: String, required: true, maxLength: 100 },
  date_of_birth: { type: Date },
  date_of_death: { type: Date },
});

// Virtual for author's full name
AuthorSchema.virtual("name").get(function () {
  // To avoid errors in cases where an author does not have either a family name or first name
  // We want to make sure we handle the exception by returning an empty string for that case
  let fullname = "";
  if (this.first_name && this.family_name) {
    fullname = `${this.family_name}, ${this.first_name}`;
  }

  return fullname;
});

// Virtual for author's URL
AuthorSchema.virtual("url").get(function () {
  // We don't use an arrow function as we'll need the this object
  return `/catalog/author/${this._id}`;
});

// Export model
module.exports = mongoose.model("Author", AuthorSchema);
同時に、AuthorSchema に対して "url" という名前付きの仮想プロパティを宣言しました。これは、モデルの具体的なインスタンスを取得するために必要な絶対 URL を返すものです。具体的な著者のリンクを取得する必要がある際は、テンプレート内でこのプロパティを使用します。
メモ: スキーマ内で URL を仮想として宣言しておくのはよい考えです。そうすれば、アイテムの URL を変更する必要があるのは、たった 1 か所だけで済むからです。 現時点では、個々のモデルインスタンスを処理するルーティングコードがまだないため、この URL を使用したリンクは機能しません。 それについては、今後の記事で設定していきます!
このモジュールの最後に、モデルをエクスポートします。
Book モデル
下記に示す Book スキーマのコードをコピーし、./models/book.js ファイルに貼り付けてください。
その大部分は author モデルと似ています。ここでは、いくつかの文字列フィールドと、特定の書籍レコードの URL を取得するための仮想フィールドを含むスキーマを宣言し、モデルをエクスポートしています。
const mongoose = require("mongoose");

const Schema = mongoose.Schema;

const BookSchema = new Schema({
  title: { type: String, required: true },
  author: { type: Schema.Types.ObjectId, ref: "Author", required: true },
  summary: { type: String, required: true },
  isbn: { type: String, required: true },
  genre: [{ type: Schema.Types.ObjectId, ref: "Genre" }],
});

// Virtual for book's URL
BookSchema.virtual("url").get(function () {
  // We don't use an arrow function as we'll need the this object
  return `/catalog/book/${this._id}`;
});

// Export model
module.exports = mongoose.model("Book", BookSchema);
ここでの主な違いは、他のモデルへの参照を 2 つ作成した点です。
authorは単一のAuthorモデルオブジェクトへの参照であり、必須です。genreはGenreモデルオブジェクトの配列への参照です。このオブジェクトはまだ宣言していません!
BookInstance モデル
最後に、下記に示す BookInstance のスキーマコードをコピーし、./models/bookinstance.js ファイルに貼り付けてください。
BookInstance は、誰かが借りる可能性のある書籍の特定の1冊を表しており、その書籍が利用できるかどうか、返却予定日、および「版」(またはバージョン)の詳細といった情報が含まれています。
const mongoose = require("mongoose");

const Schema = mongoose.Schema;

const BookInstanceSchema = new Schema({
  book: { type: Schema.Types.ObjectId, ref: "Book", required: true }, // reference to the associated book
  imprint: { type: String, required: true },
  status: {
    type: String,
    required: true,
    enum: ["Available", "Maintenance", "Loaned", "Reserved"],
    default: "Maintenance",
  },
  due_back: { type: Date, default: Date.now },
});

// Virtual for bookinstance's URL
BookInstanceSchema.virtual("url").get(function () {
  // We don't use an arrow function as we'll need the this object
  return `/catalog/bookinstance/${this._id}`;
});

// Export model
module.exports = mongoose.model("BookInstance", BookInstanceSchema);
ここで示しているのは、フィールドのオプションです。
enum: これにより、文字列の許容値を設定することができます。この場合、書籍の在庫状況を指定するために使用しています(enum を使用することで、スペルミスや不適切な値が設定されるのを防ぐことができます)。default:defaultを使用することで、新しく作成された書籍インスタンスのデフォルトの状態を「メンテナンス中」に設定し、デフォルトのdue_back日付をnowに設定します(日付を設定する際に Date 関数を呼び出すことができる点にご注目ください!)。
それ以外の部分は、前回のスキーマでご存知の通りです。
Genre モデル - チャレンジ
./models/genre.js ファイルを開き、ジャンル(書籍のカテゴリー、例えばフィクションかノンフィクションか、恋愛小説か軍事史かなど)を格納するためにスキーマを作成してください。
定義は他のモデルとよく似ています。
- モデルには、ジャンルを説明する
nameという名前のStringスキーマタイプを持つ必要があります。 - この
nameは要求される項目であり、文字数は3文字以上100文字以下とします。 - ジャンルのURLを表す
urlという名前付きの仮想プロパティを宣言します。 - モデルをエクスポートします。
テスト — いくつかのアイテムの作成
これで完了です。これでサイトのすべてのモデルが設定されました!
モデルを検査するため(そして、次の記事で使用できるサンプル書籍やその他のアイテムを生成するため)、ここでは独立したスクリプトを実行し、それぞれのタイプのアイテムを生成します:
-
express-locallibrary-tutorial ディレクトリー内(
package.jsonと同じ階層)に、ファイル populatedb.js をダウンロード(または作成)してください。メモ:
populatedb.js内のコードは JavaScript を学ぶ上で有益ですが、このチュートリアルを進める上で、その内容を理解する必要はありません。 -
コマンドプロンプトで
nodeを使用してスクリプトを実行し、MongoDB データベースの URL を渡してください(先ほどapp.js内で_insert_your_database_url_here_というプレースホルダーを置き換えたものと同じものです)。bashnode populatedb <your MongoDB url>メモ: Windows では、データベースの URL を二重引用符 (") で囲む必要があります。 その他のオペレーティングシステムでは、単一の引用符 (') を使用する必要がある場合があります。
-
スクリプトは最後まで実行され、アイテムが作成されるたびに端末に表示されるはずです。
メモ: MongoDB Atlas のデータベース(Collections タブ)に移動してください。 これで、Books、Authors、Genres、BookInstances の各集合を詳細に調べ、個々の文書を調べられるようになります。
まとめ
この記事では、Node/Express 上のデータベースと ORM について、また Mongoose のスキーマとモデルの定義方法について多くのことを学びました。次に、この情報を使用して、地域図書館ウェブサイト用の Book、BookInstance、Author、Genre を設計および実装しました。
最後に、(スタンドアロンスクリプトを使用して)多数のインスタンスを作成することによってモデルをテストしました。次の記事では、これらのオブジェクトを表示するためのページの作成について見ていきます。
関連情報
- Database integration (Express ドキュメント)
- Mongoose website (Mongoose ドキュメント)
- Mongoose Guide (Mongoose ドキュメント)
- Validation (Mongoose ドキュメント)
- Schema Types (Mongoose ドキュメント)
- Models (Mongoose ドキュメント)
- Queries (Mongoose ドキュメント)
- Population (Mongoose ドキュメント)