HTML table basics
This article gets you started with HTML tables, covering the very basics such as rows, cells, headings, making cells span multiple columns and rows, and how to group together all the cells in a column for styling purposes.
| Prerequisites: | The basics of HTML (see Introduction to HTML). |
|---|---|
| Objective: | To gain basic familiarity with HTML tables. |
What is a table?
A table is a structured set of data made up of rows and columns (tabular data). A table allows you to quickly and easily look up values that indicate some kind of connection between different types of data, for example a person and their age, or a day of the week, or the timetable for a local swimming pool.

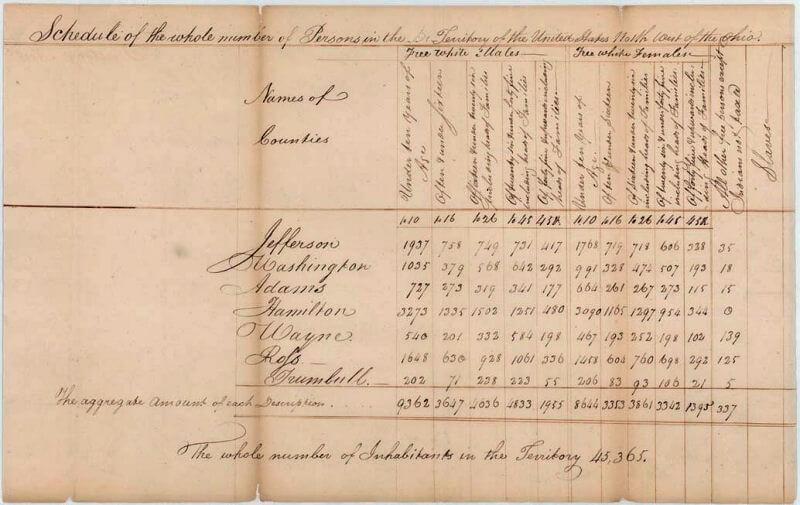
Tables are very commonly used in human society, and have been for a long time, as evidenced by this US Census document from 1800:
It is therefore no wonder that the creators of HTML provided a means by which to structure and present tabular data on the web.
How does a table work?
The point of a table is that it is rigid. Information is easily interpreted by making visual associations between row and column headers. Look at the table below for example and find a Jovian gas giant with 62 moons. You can find the answer by associating the relevant row and column headers.
When implemented correctly, HTML tables are handled well by accessibility tools such as screen readers, so a successful HTML table should enhance the experience of sighted and visually impaired users alike.
Table styling
You can also have a look at the live example on GitHub! One thing you'll notice is that the table does look a bit more readable there — this is because the table you see above on this page has minimal styling, whereas the GitHub version has more significant CSS applied.
Be under no illusion; for tables to be effective on the web, you need to provide some styling information with CSS, as well as good solid structure with HTML. In this module we are focusing on the HTML part; to find out about the CSS part you should visit our Styling tables article after you've finished here.
We won't focus on CSS in this module, but we have provided a minimal CSS stylesheet for you to use that will make your tables more readable than the default you get without any styling. You can find the stylesheet here, and you can also find an HTML template that applies the stylesheet — these together will give you a good starting point for experimenting with HTML tables.
When should you NOT use HTML tables?
HTML tables should be used for tabular data — this is what they are designed for. Unfortunately, a lot of people used to use HTML tables to lay out web pages, e.g. one row to contain the header, one row to contain the content columns, one row to contain the footer, etc. You can find more details and an example at Page Layouts in our Accessibility Learning Module. This was commonly used because CSS support across browsers used to be terrible; table layouts are much less common nowadays, but you might still see them in some corners of the web.
In short, using tables for layout rather than CSS layout techniques is a bad idea. The main reasons are as follows:
- Layout tables reduce accessibility for visually impaired users: screen readers, used by blind people, interpret the tags that exist in an HTML page and read out the contents to the user. Because tables are not the right tool for layout, and the markup is more complex than with CSS layout techniques, the screen readers' output will be confusing to their users.
- Tables produce tag soup: As mentioned above, table layouts generally involve more complex markup structures than proper layout techniques. This can result in the code being harder to write, maintain, and debug.
- Tables are not automatically responsive: When you use proper layout containers (such as
<header>,<section>,<article>, or<div>), their width defaults to 100% of their parent element. Tables on the other hand are sized according to their content by default, so extra measures are needed to get table layout styling to effectively work across a variety of devices.
Active learning: Creating your first table
We've talked table theory enough, so, let's dive into a practical example and build up a simple table.
- First of all, make a local copy of blank-template.html and minimal-table.css in a new directory on your local machine.
- The content of every table is enclosed by these two tags:
<table></table>. Add these inside the body of your HTML. - The smallest container inside a table is a table cell, which is created by a
<td>element ('td' stands for 'table data'). Add the following inside your table tags:html<td>Hi, I'm your first cell.</td> - If we want a row of four cells, we need to copy these tags three times. Update the contents of your table to look like so:
html
<td>Hi, I'm your first cell.</td>
<td>I'm your second cell.</td>
<td>I'm your third cell.</td>
<td>I'm your fourth cell.</td>
As you will see, the cells are not placed underneath each other, rather they are automatically aligned with each other on the same row. Each <td> element creates a single cell and together they make up the first row. Every cell we add makes the row grow longer.
To stop this row from growing and start placing subsequent cells on a second row, we need to use the <tr> element ('tr' stands for 'table row'). Let's investigate this now.
- Place the four cells you've already created inside
<tr>tags, like so:html<tr> <td>Hi, I'm your first cell.</td> <td>I'm your second cell.</td> <td>I'm your third cell.</td> <td>I'm your fourth cell.</td> </tr> - Now you've made one row, have a go at making one or two more — each row needs to be wrapped in an additional
<tr>element, with each cell contained in a<td>.
Result
This should result in a table that looks something like the following:
Note: You can also find this on GitHub as simple-table.html (see it live also).
Adding headers with <th> elements
Now let's turn our attention to table headers — special cells that go at the start of a row or column and define the type of data that row or column contains (as an example, see the "Person" and "Age" cells in the first example shown in this article). To illustrate why they are useful, have a look at the following table example. First the source code:
<table>
<tr>
<td> </td>
<td>Knocky</td>
<td>Flor</td>
<td>Ella</td>
<td>Juan</td>
</tr>
<tr>
<td>Breed</td>
<td>Jack Russell</td>
<td>Poodle</td>
<td>Streetdog</td>
<td>Cocker Spaniel</td>
</tr>
<tr>
<td>Age</td>
<td>16</td>
<td>9</td>
<td>10</td>
<td>5</td>
</tr>
<tr>
<td>Owner</td>
<td>Mother-in-law</td>
<td>Me</td>
<td>Me</td>
<td>Sister-in-law</td>
</tr>
<tr>
<td>Eating Habits</td>
<td>Eats everyone's leftovers</td>
<td>Nibbles at food</td>
<td>Hearty eater</td>
<td>Will eat till he explodes</td>
</tr>
</table>
Now the actual rendered table:
The problem here is that, while you can kind of make out what's going on, it is not as easy to cross reference data as it could be. If the column and row headings stood out in some way, it would be much better.
Active learning: table headers
Let's have a go at improving this table.
- First, make a local copy of our dogs-table.html and minimal-table.css files in a new directory on your local machine. The HTML contains the same Dogs example as you saw above.
- To recognize the table headers as headers, both visually and semantically, you can use the
<th>element ('th' stands for 'table header'). This works in exactly the same way as a<td>, except that it denotes a header, not a normal cell. Go into your HTML, and change all the<td>elements surrounding the table headers into<th>elements. - Save your HTML and load it in a browser, and you should see that the headers now look like headers.
Note: You can find our finished example at dogs-table-fixed.html on GitHub (see it live also).
Why are headers useful?
We have already partially answered this question — it is easier to find the data you are looking for when the headers clearly stand out, and the design just generally looks better.
Note: Table headings come with some default styling — they are bold and centered even if you don't add your own styling to the table, to help them stand out.
Tables headers also have an added benefit — along with the scope attribute (which we'll learn about in the next article), they allow you to make tables more accessible by associating each header with all the data in the same row or column. Screen readers are then able to read out a whole row or column of data at once, which is pretty useful.
Allowing cells to span multiple rows and columns
Sometimes we want cells to span multiple rows or columns. Take the following simple example, which shows the names of common animals. In some cases, we want to show the names of the males and females next to the animal name. Sometimes we don't, and in such cases we just want the animal name to span the whole table.
The initial markup looks like this:
<table>
  <tr>
    <th>Animals</th>
  </tr>
  <tr>
    <th>Hippopotamus</th>
  </tr>
  <tr>
    <th>Horse</th>
    <td>Mare</td>
  </tr>
  <tr>
    <td>Stallion</td>
  </tr>
  <tr>
    <th>Crocodile</th>
  </tr>
  <tr>
    <th>Chicken</th>
    <td>Hen</td>
  </tr>
  <tr>
    <td>Rooster</td>
  </tr>
</table>
But the output doesn't give us quite what we want:
We need a way to get "Animals", "Hippopotamus", and "Crocodile" to span across two columns, and "Horse" and "Chicken" to span downwards over two rows. Fortunately, table headers and cells have the colspan and rowspan attributes, which allow us to do just those things. Both accept a unitless number value, which equals the number of rows or columns you want spanned. For example, colspan="2" makes a cell span two columns.
Let's use colspan and rowspan to improve this table.
- First, make a local copy of our animals-table.html and minimal-table.css files in a new directory on your local machine. The HTML contains the same animals example as you saw above.
- Next, use
colspanto make "Animals", "Hippopotamus", and "Crocodile" span across two columns. - Finally, use
rowspanto make "Horse" and "Chicken" span across two rows. - Save and open your code in a browser to see the improvement.
Note: You can find our finished example at animals-table-fixed.html on GitHub (see it live also).
Providing common styling to columns
Styling without <col>
There is one last feature we'll tell you about in this article before we move on. HTML has a method of defining styling information for an entire column of data all in one place — the <col> and <colgroup> elements. These exist because it can be a bit annoying and inefficient having to specify styling on columns — you generally have to specify your styling information on every <td> or <th> in the column, or use a complex selector such as :nth-child.
Note: Styling columns like this is limited to a few properties: border, background, width, and visibility. To set other properties you'll have to either style every <td> or <th> in the column, or use a complex selector such as :nth-child.
Take the following simple example:
<table>
  <tr>
    <th>Data 1</th>
    <th style="background-color: yellow">Data 2</th>
  </tr>
  <tr>
    <td>Calcutta</td>
    <td style="background-color: yellow">Orange</td>
  </tr>
  <tr>
    <td>Robots</td>
    <td style="background-color: yellow">Jazz</td>
  </tr>
</table>
Which gives us the following result:
This isn't ideal, as we have to repeat the styling information across all three cells in the column (we'd probably have a class set on all three in a real project and specify the styling in a separate stylesheet).
Styling with <col>
Instead of doing this, we can specify the information once, on a <col> element. <col> elements are specified inside a <colgroup> container just below the opening <table> tag. We could create the same effect as we see above by specifying our table as follows:
<table>
  <colgroup>
    <col />
    <col style="background-color: yellow" />
  </colgroup>
  <tr>
    <th>Data 1</th>
    <th>Data 2</th>
  </tr>
  <tr>
    <td>Calcutta</td>
    <td>Orange</td>
  </tr>
  <tr>
    <td>Robots</td>
    <td>Jazz</td>
  </tr>
</table>
Effectively we are defining two "style columns", one specifying styling information for each column. We are not styling the first column, but we still have to include a blank <col> element — if we didn't, the styling would just be applied to the first column.
If we wanted to apply the styling information to both columns, we could just include one <col> element with a span attribute on it, like this:
<colgroup>
  <col style="background-color: yellow" span="2" />
</colgroup>
Just like colspan and rowspan, span takes a unitless number value that specifies the number of columns you want the styling to apply to.
Note: When the table, a column, and table cells in that column are all styled separately then styles applied to the cells are painted on top of column styles which are painted on top of the table. This is because the table layer is rendered first, then the columns' layer is rendered, with the cells' layer rendered on top of all the other table layers.
Active learning: colgroup and col
Now it's time to have a go yourself.
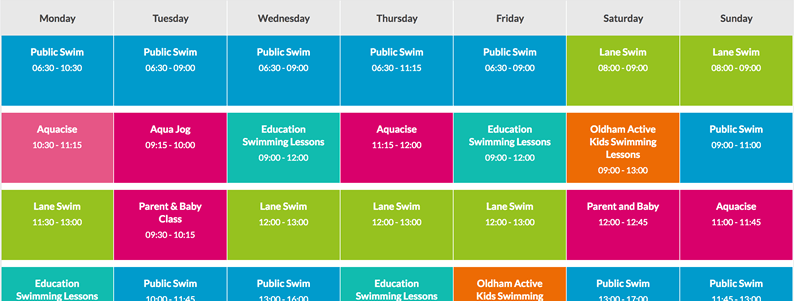
Below you can see the timetable of a languages teacher. On Friday she has a new class teaching Dutch all day, but she also teaches German for a few periods on Tuesday and Thursdays. She wants to highlight the columns containing the days she is teaching.
Recreate the table by following the steps below.
- First, make a local copy of our timetable.html file in a new directory on your local machine. The HTML contains the same table you saw above, minus the column styling information.
- Add a
<colgroup>element at the top of the table, just underneath the<table>tag, in which you can add your<col>elements (see the remaining steps below). - The first two columns need to be left unstyled.
- Add a background color to the third column. The value for your
styleattribute isbackground-color:#97DB9A; - Set a separate width on the fourth column. The value for your
styleattribute iswidth: 42px; - Add a background color to the fifth column. The value for your
styleattribute isbackground-color: #97DB9A; - Add a different background color plus a border to the sixth column, to signify that this is a special day and she's teaching a new class. The values for your
styleattribute arebackground-color:#DCC48E; border:4px solid #C1437A; - The last two days are free days, so just set them to no background color but a set width; the value for the
styleattribute iswidth: 42px;
See how you get on with the example. If you get stuck, or want to check your work, you can find our version on GitHub as timetable-fixed.html (see it live also).
Summary
That just about wraps up the basics of HTML tables. In the next article, we'll look at some slightly more advanced table features, and start to think how accessible they are for visually impaired people.