開始寫我們的 Svelte 待辦清單應用程式
現在我們已經對 Svelte 運作機制有初步的了解後,就能開始建構我們的範例應用程式:一個待辦清單。此篇文章中,我們會先確認應用程式所需的功能有哪些,接著我們會建立 Todos.svelte 元件並寫一些靜態標記(markup)語言和樣式,待一切準備就緒後,就能開始開發我們待辦清單應用程式的相關功能,隨著後續文章會逐漸充實它。
我們想要讓使用者們能夠瀏覽、新增和刪除任務,也能註記它們以視為完成。這將是我們在走這個教學系列時會開發到的基本功能,此外,在開發過程中我們將會看到一些更進階的概念。
| 預備知識: |
推薦你至少需熟悉基本的 HTML、 CSS 與 JavaScript 等程式語言且具備終端機/命令列環境 (en-US)基本知識。 你將會需要一個安裝了 node 和 npm 的終端機來編譯和建置你的應用程式。 |
|---|---|
| 學習目標: | 學習如何建立一個 Svelte 元件並於另一個元件內渲染它,透過屬性(props)傳遞資料並保存它的狀態。 |
和我們一起撰寫程式碼
Git
複製 Github 儲存庫(假如你還沒完成)如下:
git clone https://github.com/opensas/mdn-svelte-tutorial.git
接著取得當前應用程式狀態,執行如下:
cd mdn-svelte-tutorial/02-starting-our-todo-app
或直接下載資料夾內容如下:
npx degit opensas/mdn-svelte-tutorial/02-starting-our-todo-app
記得執行 npm install && npm run dev 以開發模式來運行你的應用程式。
REPL
為了使用 REPL 和我們一起撰寫程式碼,點擊如下連結:
https://svelte.dev/repl/b7b831ea3a354d3789cefbc31e2ca495?version=3.23.2
待辦清單應用程式特徵
這是我們預計完成待辦清單應用程式的樣子:
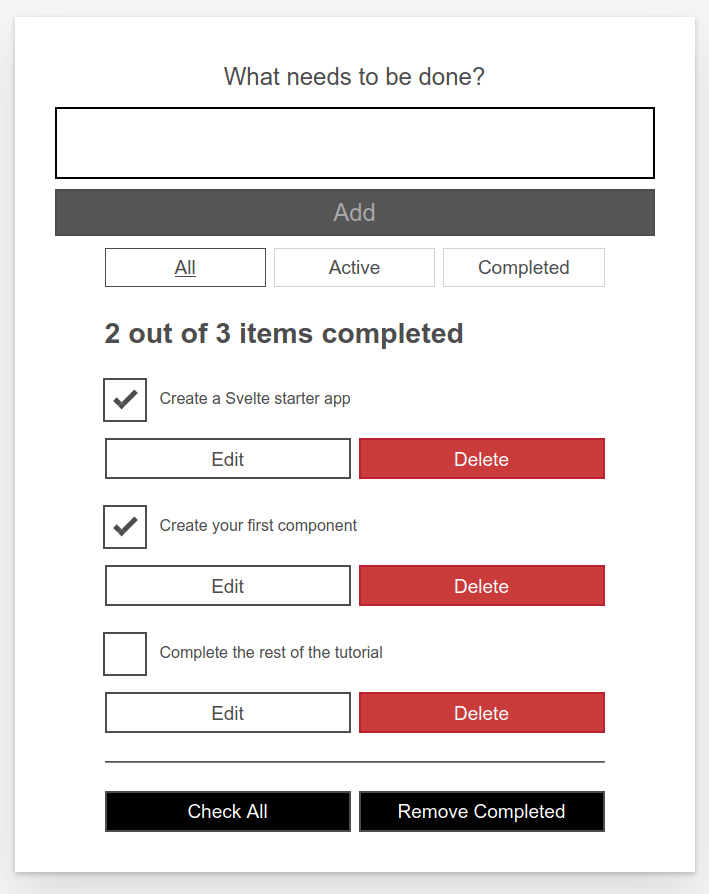
使用這個使用者介面,我們的使用者將能夠做到以下事情:
- 瀏覽他們的任務。
- 註記任務為已完成或待辦理,而不是刪除它們。
- 刪除任務。
- 新增任務。
- 藉由狀態來過濾那些任務:全部、現行或已完成任務。
- 編輯任務。
- 註記全部任務為現行或已完成狀態。
- 刪除全部已完成任務。
建立我們第一個元件
建立 Todos.svelte 元件——這將包含我們的待辦任務。
- 建立新資料夾——
src/components。備註: 你可以把元件們放在
src資料夾當中的任何地方,但放在components資料夾是比較常見的做法,也讓你可以更容易地找到它們。 - 建立
src/components/Todos.svelte檔案並包含以下內容:html<h1>Svelte To-Do list</h1> - 改變
public/index.html中的title元素內容為 Svelte To-do list:html<title>Svelte To-Do list</title> - 打開
src/App.svelte並替換為以下內容:html<script> import Todos from "./components/Todos.svelte"; </script> <Todos /> - 在開發模式中,當定義屬性沒有存在於元件時,Svelte 將會在瀏覽器主控台發出警告;以此例來看,當我們於
src/main.js實例化App元件時,由於我們已經明確定義出name屬性,但並無實際在App中使用到。所以主控台現在應該會給你一個警告訊息,如「<App> was created with unknown prop 'name'」。而為了排除這個問題,從src/main.js中移除name屬性;看起來應該要像是如下這樣:jsimport App from "./App.svelte"; const app = new App({ target: document.body, }); export default app;
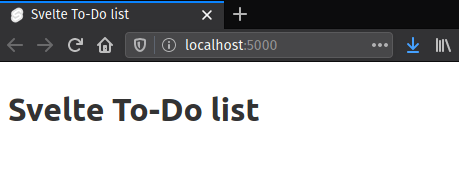
假如你現在檢查你的測試伺服器 URL,應該會看到 Todos.svelte 元件已經被渲染出如下畫面:
加上靜態標記語言
我們將會從應用程式的靜態標記語言表示開始,所以你將會看到它長什麼樣子。複製並貼上下面內容至 Todos.svelte 元件檔案以取代現有內容:
<!-- Todos.svelte -->
<div class="todoapp stack-large">
  <!-- NewTodo -->
  <form>
    <h2 class="label-wrapper">
      <label for="todo-0" class="label__lg"> What needs to be done? </label>
    </h2>
    <input type="text" id="todo-0" autocomplete="off" class="input input__lg" />
    <button type="submit" disabled="" class="btn btn__primary btn__lg">
      Add
    </button>
  </form>

  <!-- Filter -->
  <div class="filters btn-group stack-exception">
    <button class="btn toggle-btn" aria-pressed="true">
      <span class="visually-hidden">Show</span>
      <span>All</span>
      <span class="visually-hidden">tasks</span>
    </button>
    <button class="btn toggle-btn" aria-pressed="false">
      <span class="visually-hidden">Show</span>
      <span>Active</span>
      <span class="visually-hidden">tasks</span>
    </button>
    <button class="btn toggle-btn" aria-pressed="false">
      <span class="visually-hidden">Show</span>
      <span>Completed</span>
      <span class="visually-hidden">tasks</span>
    </button>
  </div>

  <!-- TodosStatus -->
  <h2 id="list-heading">2 out of 3 items completed</h2>

  <!-- Todos -->
  <ul role="list" class="todo-list stack-large" aria-labelledby="list-heading">
    <!-- todo-1 (editing mode) -->
    <li class="todo">
      <div class="stack-small">
        <form class="stack-small">
          <div class="form-group">
            <label for="todo-1" class="todo-label">
              New name for 'Create a Svelte starter app'
            </label>
            <input
              type="text"
              id="todo-1"
              autocomplete="off"
              class="todo-text" />
          </div>
          <div class="btn-group">
            <button class="btn todo-cancel" type="button">
              Cancel
              <span class="visually-hidden"
                >renaming Create a Svelte starter app</span
              >
            </button>
            <button class="btn btn__primary todo-edit" type="submit">
              Save
              <span class="visually-hidden"
                >new name for Create a Svelte starter app</span
              >
            </button>
          </div>
        </form>
      </div>
    </li>

    <!-- todo-2 -->
    <li class="todo">
      <div class="stack-small">
        <div class="c-cb">
          <input type="checkbox" id="todo-2" checked />
          <label for="todo-2" class="todo-label">
            Create your first component
          </label>
        </div>
        <div class="btn-group">
          <button type="button" class="btn">
            Edit
            <span class="visually-hidden">Create your first component</span>
          </button>
          <button type="button" class="btn btn__danger">
            Delete
            <span class="visually-hidden">Create your first component</span>
          </button>
        </div>
      </div>
    </li>

    <!-- todo-3 -->
    <li class="todo">
      <div class="stack-small">
        <div class="c-cb">
          <input type="checkbox" id="todo-3" />
          <label for="todo-3" class="todo-label">
            Complete the rest of the tutorial
          </label>
        </div>
        <div class="btn-group">
          <button type="button" class="btn">
            Edit
            <span class="visually-hidden"
              >Complete the rest of the tutorial</span
            >
          </button>
          <button type="button" class="btn btn__danger">
            Delete
            <span class="visually-hidden"
              >Complete the rest of the tutorial</span
            >
          </button>
        </div>
      </div>
    </li>
  </ul>

  <hr />

  <!-- MoreActions -->
  <div class="btn-group">
    <button type="button" class="btn btn__primary">Check all</button>
    <button type="button" class="btn btn__primary">Remove completed</button>
  </div>
</div>
再次確認已經渲染出來的畫面,你應該會看到如下樣子:
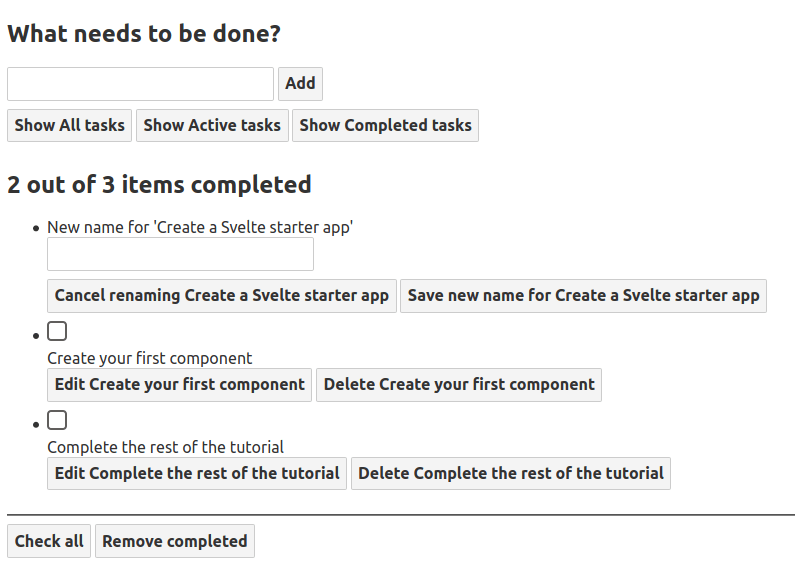
上面 HTML 標記語言的樣式並不是那麼好看,而且也沒有實際功能。儘管如此,接著來看看它和我們想要的功能如何關聯起來:
- 一個標籤和一個輸入框用來輸入新任務。
- 三個按鈕則依據狀態來過濾任務。
- 一個標籤用來顯示任務總數及已完成任務數量。
- 一個無順序清單,其中包含每一個任務項目。
- 編輯任務時,清單項目會有輸入框和兩個按鈕去取消或儲存變更。
- 如果任務處於非編輯狀態時,會有勾選框可以去設定已完成狀態和兩個按鈕去編輯或刪除任務。
- 最後有兩個按鈕可以去勾選/不勾選所有任務和刪除已完成的那些任務。
隨後的文章我們會逐一將這些功能完善,以及除此之外的功能等等。
待辦清單的無障礙特徵
你可能有注意到一些特殊的屬性。例如:
<button class="btn toggle-btn" aria-pressed="true">
  <span class="visually-hidden">Show</span>
  <span>All</span>
  <span class="visually-hidden">tasks</span>
</button>
在這裡,aria-pressed 告訴輔助技術(像是螢幕閱讀器)按鈕可以是兩狀態其中之一:pressed 或 unpressed。可以想像類似於開關狀態。設定數值為 true 時,意謂著按鈕預設是被按下的。
visually-hidden 類別現在還沒有效果,因為我們還沒引入任何 CSS。一旦引入我們的樣式後,對於可以看見的使用者們會隱藏那些具有此類別的元素並仍能夠讓那些螢幕閱讀器使用者來使用——這是因為這些文字並不需要給可以看見的使用者看到;它們提供更多資訊讓那些螢幕閱讀器使用者了解按鈕實際可以做什麼,而不需要借助一些額外的視覺環境來幫助他們。
在往下看一點,你可以找到如下 <ul> 元素:
<ul
  role="list"
  className="todo-list stack-large"
  aria-labelledby="list-heading"></ul>
role 屬性則幫助輔助技術去解釋元素具有什麼種類的語義數值——或它的目的。預設情況下,<ul> 會被視為清單,但在加上樣式之後會破壞原有性質。明確定義規則為「list」將能復原 <ul> 元素本身意義。假如你想要知道更多為什麼需要明確定義的話,可以去參考 Scott O'Hara 的「Fixing Lists」文章。
aria-labelledby 屬性則告訴輔助技術,我們把 <h2> 且 id 為 list-heading 作為描述下面清單用途的標籤。建立這種關聯為清單提供更多上下文資訊,這可以幫助螢幕閱讀器使用者更好地去了解它的目的。
這似乎是討論 Svelte 如何處理無障礙性的好時機;讓我們繼續看下去。
Svelte 無障礙性支援
Svelte 特別重視無障礙性。目的是鼓勵開發人員盡可能預設地寫出無障礙程式碼。作為編譯器,Svelte 能靜態地分析我們的 HTML 範本,而當元件被編譯後,就能提出一些無障礙警告。
無障礙性(縮寫為 a11y)一直以來不容易寫正確,但 Svelte 將會協助並警告你,假如你寫出了不容易閱讀的標記語言。
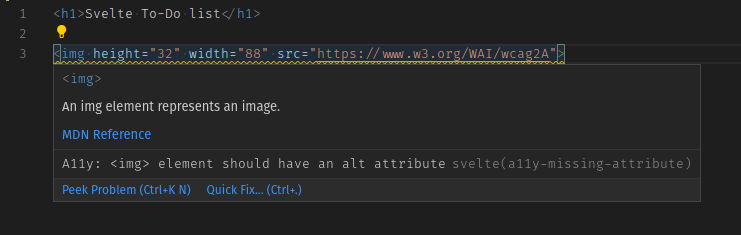
舉例來說,假如我們新增 <img> 元素至我們的 todos.svelte 元件,但沒有對應的 alt 屬性時:
<h1>Svelte To-Do list</h1>

<img height="32" width="88" src="https://www.w3.org/WAI/wcag2A" />
編譯器將會報出下列警告:
(!) Plugin svelte: A11y: <img> element should have an alt attribute
src/components/Todos.svelte
1: <h1>Svelte To-Do list</h1>
2:
3: <img height="32" width="88" src="https://www.w3.org/WAI/wcag2A">
   ^
created public/build/bundle.js in 220ms

[2020-07-15 04:07:43] waiting for changes...
此外,在我們呼叫編譯器之前,編輯器也會顯示這個警告:
你可以使用以 svelte-ignore 開頭的註解,來告訴 Svelte 去忽略下一個標記語言區塊的警告,像是如下:
<!-- svelte-ignore a11y-missing-attribute -->
<img height="32" width="88" src="https://www.w3.org/WAI/wcag2A" />
備註: 透過 VSCode 你可以點擊 Quick fix... 連結或按 Ctrl + . 來自動地加上這個忽略註解。
假如你想要全域地關閉這個警告,可以在你的 rollup.config.js 檔案中調整 Svelte 外掛組態並補上這個 onwarn 處理器即可,像是如下:
plugins: [
  svelte({
    dev: !production,
    css: css => {
      css.write('public/build/bundle.css');
    },
    // Warnings are normally passed straight to Rollup. You can
    // optionally handle them here, for example to squelch
    // warnings with a particular code
    onwarn: (warning, handler) => {
      // e.g. I don't care about screen readers -> please DON'T DO THIS!!!
      if (warning.code === 'a11y-missing-attribute') return;

      // let Rollup handle all other warnings normally
      handler(warning);
    }
  }),

  ...
]
在設計上,這些警告被實現於編譯器本身,而不是你可以選擇性加入專案的外掛。理念是建立在預設會檢核你的標記語言有無 a11y 問題並讓你可以選擇排除特定警告。
備註: 假如你有足夠充分的理由,則可以先停用這些警告,例如當你在快速建構原型時。成為一個優秀的網路公民並讓你的頁面盡可能廣泛地被用戶閱讀是很重要的。
Svelte 透過 eslint-plugin-jsx-a11y 來檢核無障礙性規則,它是提供在 JSX 元素上許多無障礙性規則靜態檢核的一個 ESLint 外掛。Svelte 企圖將它們全部實現於編譯器中,而大部分都已經移植至 Svelte 中。你可以在 GitHub 中看到尚未實現的無障礙檢核。點選規則的連結可以查閱它們各自的涵義。
為標記語言加上樣式
讓我們來將待辦清單變得好看些。將以下內容取代至 public/global.css 檔案中:
/* RESETS */
*,
*::before,
*::after {
  box-sizing: border-box;
}
*:focus {
  outline: 3px dashed #228bec;
  outline-offset: 0;
}
html {
  font: 62.5% / 1.15 sans-serif;
}
h1,
h2 {
  margin-bottom: 0;
}
ul {
  list-style: none;
  padding: 0;
}
button {
  border: none;
  margin: 0;
  padding: 0;
  width: auto;
  overflow: visible;
  background: transparent;
  color: inherit;
  font: inherit;
  line-height: normal;
  -webkit-font-smoothing: inherit;
  -moz-osx-font-smoothing: inherit;
  -webkit-appearance: none;
}
button::-moz-focus-inner {
  border: 0;
}
button,
input,
optgroup,
select,
textarea {
  font-family: inherit;
  font-size: 100%;
  line-height: 1.15;
  margin: 0;
}
button,
input {
  overflow: visible;
}
input[type="text"] {
  border-radius: 0;
}
body {
  width: 100%;
  max-width: 68rem;
  margin: 0 auto;
  font:
    1.6rem/1.25 Arial,
    sans-serif;
  background-color: #f5f5f5;
  color: #4d4d4d;
}
@media screen and (min-width: 620px) {
  body {
    font-size: 1.9rem;
    line-height: 1.31579;
  }
}
/*END RESETS*/

/* GLOBAL STYLES */
.form-group > input[type="text"] {
  display: inline-block;
  margin-top: 0.4rem;
}
.btn {
  padding: 0.8rem 1rem 0.7rem;
  border: 0.2rem solid #4d4d4d;
  cursor: pointer;
  text-transform: capitalize;
}
.btn.toggle-btn {
  border-width: 1px;
  border-color: #d3d3d3;
}
.btn.toggle-btn[aria-pressed="true"] {
  text-decoration: underline;
  border-color: #4d4d4d;
}
.btn__danger {
  color: #fff;
  background-color: #ca3c3c;
  border-color: #bd2130;
}
.btn__filter {
  border-color: lightgrey;
}
.btn__primary {
  color: #fff;
  background-color: #000;
}
.btn__primary:disabled {
  color: darkgrey;
  background-color: #565656;
}
.btn-group {
  display: flex;
  justify-content: space-between;
}
.btn-group > * {
  flex: 1 1 49%;
}
.btn-group > * + * {
  margin-left: 0.8rem;
}
.label-wrapper {
  margin: 0;
  flex: 0 0 100%;
  text-align: center;
}
.visually-hidden {
  position: absolute !important;
  height: 1px;
  width: 1px;
  overflow: hidden;
  clip: rect(1px 1px 1px 1px);
  clip: rect(1px, 1px, 1px, 1px);
  white-space: nowrap;
}
[class*="stack"] > * {
  margin-top: 0;
  margin-bottom: 0;
}
.stack-small > * + * {
  margin-top: 1.25rem;
}
.stack-large > * + * {
  margin-top: 2.5rem;
}
@media screen and (min-width: 550px) {
  .stack-small > * + * {
    margin-top: 1.4rem;
  }
  .stack-large > * + * {
    margin-top: 2.8rem;
  }
}
.stack-exception {
  margin-top: 1.2rem;
}
/* END GLOBAL STYLES */

.todoapp {
  background: #fff;
  margin: 2rem 0 4rem 0;
  padding: 1rem;
  position: relative;
  box-shadow:
    0 2px 4px 0 rgba(0, 0, 0, 0.2),
    0 2.5rem 5rem 0 rgba(0, 0, 0, 0.1);
}
@media screen and (min-width: 550px) {
  .todoapp {
    padding: 4rem;
  }
}
.todoapp > * {
  max-width: 50rem;
  margin-left: auto;
  margin-right: auto;
}
.todoapp > form {
  max-width: 100%;
}
.todoapp > h1 {
  display: block;
  max-width: 100%;
  text-align: center;
  margin: 0;
  margin-bottom: 1rem;
}
.label__lg {
  line-height: 1.01567;
  font-weight: 300;
  padding: 0.8rem;
  margin-bottom: 1rem;
  text-align: center;
}
.input__lg {
  padding: 2rem;
  border: 2px solid #000;
}
.input__lg:focus {
  border-color: #4d4d4d;
  box-shadow: inset 0 0 0 2px;
}
[class*="__lg"] {
  display: inline-block;
  width: 100%;
  font-size: 1.9rem;
}
[class*="__lg"]:not(:last-child) {
  margin-bottom: 1rem;
}
@media screen and (min-width: 620px) {
  [class*="__lg"] {
    font-size: 2.4rem;
  }
}
.filters {
  width: 100%;
  margin: unset auto;
}
/* Todo item styles */
.todo {
  display: flex;
  flex-direction: row;
  flex-wrap: wrap;
}
.todo > * {
  flex: 0 0 100%;
}
.todo-text {
  width: 100%;
  min-height: 4.4rem;
  padding: 0.4rem 0.8rem;
  border: 2px solid #565656;
}
.todo-text:focus {
  box-shadow: inset 0 0 0 2px;
}
/* CHECKBOX STYLES */
.c-cb {
  box-sizing: border-box;
  font-family: Arial, sans-serif;
  -webkit-font-smoothing: antialiased;
  font-weight: 400;
  font-size: 1.6rem;
  line-height: 1.25;
  display: block;
  position: relative;
  min-height: 44px;
  padding-left: 40px;
  clear: left;
}
.c-cb > label::before,
.c-cb > input[type="checkbox"] {
  box-sizing: border-box;
  top: -2px;
  left: -2px;
  width: 44px;
  height: 44px;
}
.c-cb > input[type="checkbox"] {
  -webkit-font-smoothing: antialiased;
  cursor: pointer;
  position: absolute;
  z-index: 1;
  margin: 0;
  opacity: 0;
}
.c-cb > label {
  font-size: inherit;
  font-family: inherit;
  line-height: inherit;
  display: inline-block;
  margin-bottom: 0;
  padding: 8px 15px 5px;
  cursor: pointer;
  touch-action: manipulation;
}
.c-cb > label::before {
  content: "";
  position: absolute;
  border: 2px solid currentColor;
  background: transparent;
}
.c-cb > input[type="checkbox"]:focus + label::before {
  border-width: 4px;
  outline: 3px dashed #228bec;
}
.c-cb > label::after {
  box-sizing: content-box;
  content: "";
  position: absolute;
  top: 11px;
  left: 9px;
  width: 18px;
  height: 7px;
  transform: rotate(-45deg);
  border: solid;
  border-width: 0 0 5px 5px;
  border-top-color: transparent;
  opacity: 0;
  background: transparent;
}
.c-cb > input[type="checkbox"]:checked + label::after {
  opacity: 1;
}
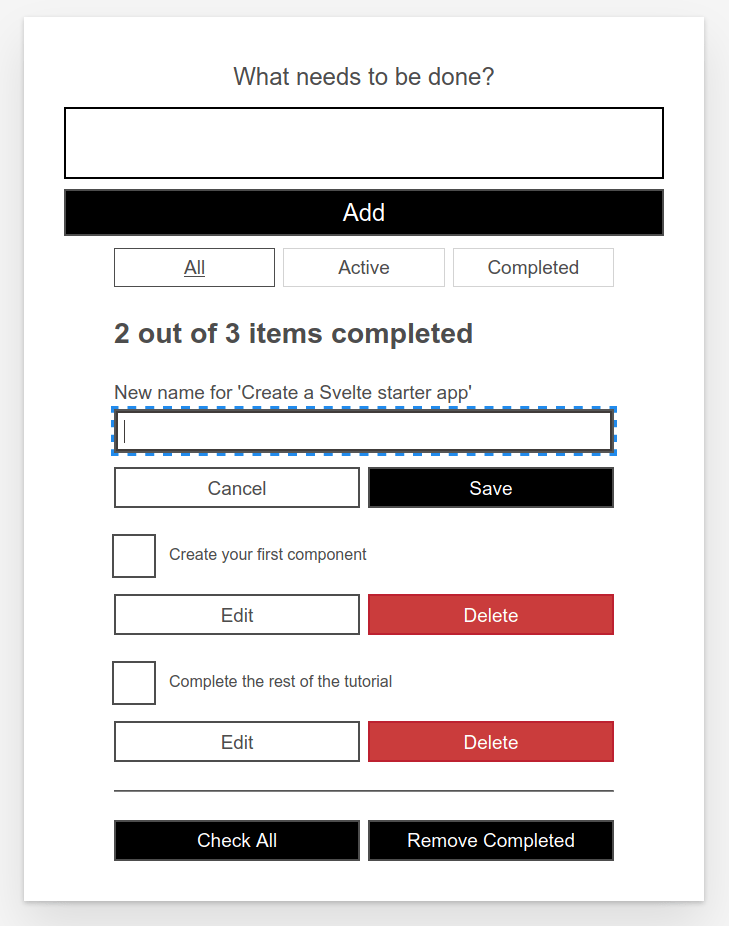
當我們為標記語言加上樣式後,現在看起來好多了:
到目前為止的程式碼
Git
若想要看到本文結束後程式碼所呈現的最終結果,你可以參照下列的方式存取我們已經複製下來的儲存庫:
cd mdn-svelte-tutorial/03-adding-dynamic-behavior
或直接下載資料夾內容:
npx degit opensas/mdn-svelte-tutorial/03-adding-dynamic-behavior
記得執行 npm install && npm run dev 以開發模式來運行你的應用程式。
REPL
若要在 REPL 看見當前程式碼狀態,請點擊如下連結:
https://svelte.dev/repl/c862d964d48d473ca63ab91709a0a5a0?version=3.23.2