Build AI-powered applications using OpenLLM and Vultr Cloud GPU
OpenLLM is an open-source platform that enables you to create AI-powered production applications such as personalized chat-bots, recommendation systems, and more. It allows you to generate responses by sending an API prompt, along with parameters, to manipulate the response. OpenLLM's library includes all major models such as Mistral, Falcon, and Llama.
In this article, we'll demonstrate the steps to deploy the Falcon 7B model with OpenLLM on a Vultr GPU server to generate API responses, which can be used for creating AI-powered applications. You'll learn how to install the required dependencies and how to create an OpenLLM service with persistence. Additionally, we'll cover setting up Nginx as a reverse proxy for efficient load balancing and securing your application with a Secure Sockets Layer (SSL) certificate to enable HTTPS.
Deploying a server on Vultr
To efficiently deploy Artificial Intelligence (AI) or Machine Learning (ML)-powered applications, using cloud GPUs is one of the most efficient ways. Cloud GPUs provide access to the latest technology, enabling you to continuously build, deploy, and globally serve large-scale applications.
- Sign up and log in to the Vultr Customer Portal.
- Navigate to the Products page.
-
From the side menu, select Compute.

- Click the Deploy Server button in the center.
- Select Cloud GPU as the server type.
- Select A40 as the GPU type.
- In the "Server Location" section, select the region of your choice.
-
In the "Operating System" section, select Vultr GPU Stack as the operating system.
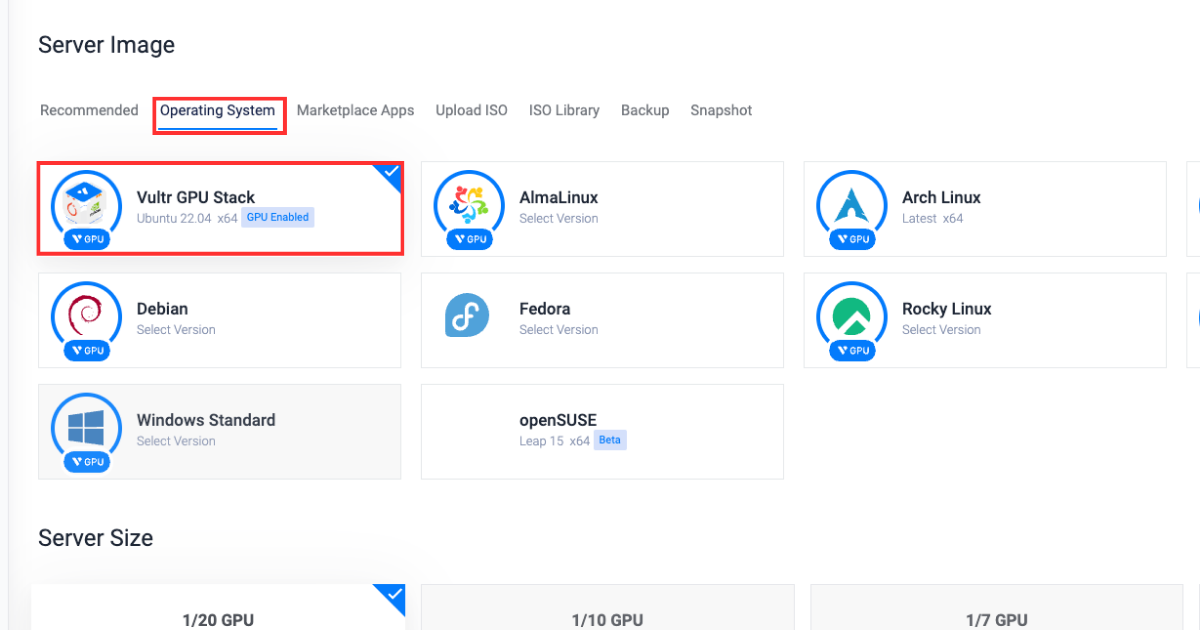 Vultr GPU Stack is designed to streamline the process of building Artificial Intelligence (AI) and Machine Learning (ML) projects by providing a comprehensive suite of pre-installed software, including NVIDIA CUDA Toolkit, NVIDIA cuDNN, Tensorflow, PyTorch, and so on.
- In the "Server Size" section, select the 48 GB option.
- Select any more features as required in the "Additional Features" section.
- Click the Deploy Now button on the bottom right corner.
Installing the required packages
After setting up a Vultr server as described earlier, this section will guide you through installing the dependency Python packages necessary for running OpenLLM and verifying the installation.
- Install the required packages.
Here's what each package represents:bash
pip3 install openllm scipy xformers einopsxformers: Provides multiple building blocks for making transformer-based models.einops: Reshapes and reduces the dimensions of multi-dimensional arrays.scipy: Solves complex mathematical problems, with capability to manipulate and visualize data.openllm: Provides the necessary dependencies to run the OpenLLM services.
- Verify the installation.
If the installation is successful, the system will find and executebash
openllm -hopenllm, displaying its help information. This indicates thatopenllmis correctly installed and recognized by the system. Ifopenllmis not installed properly, the command will likely return an error.
Creating an OpenLLM service
In this section, you'll learn how to create an OpenLLM service that starts the service automatically when the system boots up and runs the Falcon 7B model for inference.
- Get the
openllmpath.bashwhich openllm - Copy and paste the path into the clipboard. You'll use this in Step 4.
- Create an OpenLLM service file.
bash
nano /etc/systemd/system/openllm.service - Paste the following content into the service file. Make sure to replace
UserandGroupvalues with your actual values. Also replaceWorkingDirectorywith the OpenLLM path (withoutopenllm) you copied earlier andExecstartwith the actual OpenLLM path including the executable binary.bash[Unit] Description= Daemon for OpenLLM Demo Application After=network.target [Service] User=example_user Group=example_user WorkingDirectory=/home/example_user/.local/bin/ ExecStart=/home/example_user/.local/bin/openllm start tiiuae/falcon-7b --backend pt [Install] WantedBy=multi-user.target - Start the service.
bash
systemctl start openllm - Verify the status of the service.
The output will look like this:bash
systemctl status openllm● openllm.service - Daemon for OpenLLM Demo Application Loaded: loaded (/etc/systemd/system/openllm.service; enabled; vendor preset: enabled) Active: active (running) since Wed 2023-11-29 20:51:25 UTC; 12min ago Main PID: 3160 (openllm) Tasks: 257 (limit: 72213) Memory: 21.9G CGroup: /system.slice/openllm.service ├─3160 /usr/bin/python3 /usr/local/bin/openllm start tiiuae/falcon-7b --backend pt - Enable the service to start automatically whenever the system boots up.
bash
systemctl enable openllm
Configuring Nginx as a reverse proxy server
Nginx acts as a reverse proxy between your web server and clients. It directs incoming requests based on your request configuration settings.
In this section, you'll learn how to configure your OpenLLM application for reverse proxy for efficient request handling and load balancing using Nginx. You'll also learn how to configure OpenLLM itself for reverse proxy functionality.
- Log in to the Vultr Customer Portal.
- Navigate to the Products page.
- From the side menu, expand the Network drop down, and select DNS.
- Click the Add Domain button in the center.
- Follow the setup procedure to add your domain name by selecting the IP address of your server.
- Set the following hostnames as your domain's primary and secondary nameservers with your domain registrar.
- ns1.vultr.com
- ns2.vultr.com
- Install Nginx.
bash
sudo apt install nginx - Create a file named
openllm.confin thesites-availabledirectory.bashsudo nano /etc/nginx/sites-available/openllm.conf - Paste the following content into the
openllm.conffile. Make sure to replaceexample.comwith your actual domain name.The following directives are used in the above virtual host configuration:bashserver { listen 80; listen [::]:80; server_name example.com www.example.com; location / { proxy_pass http://127.0.0.1:3000/; } }serverdefines a block of settings for our domain.listeninstructs the server to listen on port80for incoming requests.server_namespecifies the domain names to which this server block will respond.locationdefines what the server should do with incoming requests.proxy_passinstructs the server to forward requests to another location, in this case tohttp://127.0.0.1:3000/.
- Save the file, and exit the editor.
- Activate the virtual host configuration by linking the
openllm.conffile to thesites-enableddirectory.bashsudo ln -s /etc/nginx/sites-available/openllm.conf /etc/nginx/sites-enabled/ - Test the configuration to identify the errors.
If the configuration has no errors, your output should look like this:bash
sudo nginx -tbashnginx: the configuration file /etc/nginx/nginx.conf syntax is ok nginx: configuration file /etc/nginx/nginx.conf test is successful - Restart the Nginx server.
bash
sudo systemctl reload nginx - Allow incoming connections on port
80.bashsudo ufw allow 80/tcp
Installing an SSL certificate using Certbot
Certbot allows you to acquire SSL certificates from "Let's Encrypt", a free certificate authority. These SSL certificates serve as cryptographic keys that enable secure communication between a user and a web server.
In this section, you'll learn how to request a free SSL certification from "Let's Encrypt" for your domain and implement HTTPS for your application. You'll also learn how to set the certificate to auto-renew before it expires in 90 days.
- Allow incoming connections on port
443for HTTPS.bashsudo ufw allow 443/tcp - Install the
certbotpackage using thesnappackage manager.bashsudo snap install --classic certbot - Request a new SSL certificate for your domain. Make sure to replace
example.comwith your actual domain name.bashsudo certbot --nginx -d example.com -d www.example.com - You can visit the OpenLLM API documentation at the following link:
url
https:
Generating an API response using OpenLLM
Having configured Nginx and SSL, this section will guide you through sending an API POST request to the OpenLLM endpoint that's responsible for generating a response from the given prompts.
Send a curl request to the API endpoint.
curl -X POST -H "Content-Type: application/json" -d '{
    "prompt": "What is the meaning of life?",
    "stop": ["\n"],
    "llm_config": {
        "max_new_tokens": 128,
        "min_length": 0,
        "early_stopping": false,
        "num_beams": 1,
        "num_beam_groups": 1,
        "use_cache": true,
        "temperature": 0.75,
        "top_k": 15,
        "top_p": 0.9,
        "typical_p": 1,
        "epsilon_cutoff": 0,
        "eta_cutoff": 0,
        "diversity_penalty": 0,
        "repetition_penalty": 1,
        "encoder_repetition_penalty": 1,
        "length_penalty": 1,
        "no_repeat_ngram_size": 0,
        "renormalize_logits": false,
        "remove_invalid_values": false,
        "num_return_sequences": 1,
        "output_attentions": false,
        "output_hidden_states": false,
        "output_scores": false,
        "encoder_no_repeat_ngram_size": 0,
        "logprobs": 0,
        "prompt_logprobs": 0,
        "n": 1,
        "presence_penalty": 0,
        "frequency_penalty": 0,
        "use_beam_search": false,
        "ignore_eos": false,
        "skip_special_tokens": true
    },
    "adapter_name": null
}' https://example.com/v1/generate
You can adjust the intensity of the response by changing the values of various parameters. Here's an explanation of what each parameter does:
top_p: Responsible for choosing the best probability tokens for the output, making the output more focused and relevant.epsilon_cutoff: Responsible for ignoring the tokens with a probability lower than the epsilon value, thereby ignoring low probability options.diversity_penalty: Responsible for influencing the diversity of the output. A higher parameter value will create a more diverse and less repetitive response.repetition_penalty: Responsible for posing a penalty on the tokens that repeat consecutively in the generated output.length_penalty: Responsible for controlling the length of the response; a higher parameter value generates a longer response and vice-versa.no_repeat_ngram_size: Responsible for penalizing the tokens forming n-grams (sequence of n tokens) that have already appeared in the response.remove_invalid_values: Responsible for automatically removing tokens with invalid values from the generated response.num_return_sequences: Responsible for controlling the different number of sequences a model should generate in a response.frequency_penalty: Responsible for manipulating the frequency at which certain tokens are selected by the model when generating the response.use_beam_search: Responsible for finding relevant continuations for response generation using beam search if the parameter value is set to true.ignore_eos: Responsible for ignoring the "end of sentence" tokens during response generation if the parameter value is set to true.n: Responsible for representing the number of tokens in each generated response.
This is a sample output of the curl request:
{
  "prompt": "What is the meaning of life?",
  "finished": true,
  "outputs": [
    {
      "index": 0,
      "text": " What is the meaning of the universe? How does the universe work?",
      "token_ids": [
        1634, 304, 248, 4113, 275, 248, 10314, 42, 1265, 960, 248, 10314, 633,
        42, 193, 1265, 960, 248, 10314, 633, 42, 193
      ],
      "cumulative_logprob": 0,
      "logprobs": null,
      "finish_reason": "stop"
    }
  ],
  "prompt_token_ids": [1562, 304, 248, 4113, 275, 1063, 42],
  "prompt_logprobs": null,
  "request_id": "openllm-e1b145f3e9614624975f76e7fae6050c"
}
Summary
In this article, you learned how to build API responses for AI-powered apps using OpenLLM and Vultr GPU stack. This tutorial guided you through the steps to create an OpenLLM service that initializes the required model and API endpoint necessary to generate responses. You also learned how to set up Nginx as a reverse proxy server for your OpenLLM service and secure it with an SSL certificate.
This is a sponsored article by Vultr. Vultr is the world's largest privately-held cloud computing platform. A favorite with developers, Vultr has served over 1.5 million customers across 185 countries with flexible, scalable, global Cloud Compute, Cloud GPU, Bare Metal, and Cloud Storage solutions. Learn more about Vultr.