Introduction to automated testing
Manually running tests on several browsers and devices, several times per day, can get tedious, and time-consuming. To handle this efficiently, you should become familiar with automation tools. In this article, we look at what is available, how to use task runners, and how to use the basics of commercial browser test automation apps such as LambdaTest, Sauce Labs, BrowserStack, and TestingBot.
| Prerequisites: | Familiarity with the core HTML, CSS, and JavaScript languages; an idea of the high level principles of cross-browser testing. |
|---|---|
| Objective: | To provide an understanding of what automated testing entails, how it can make your life easier, and how to make use of some of the commercial products that make things easier. |
Automation makes things easy
Throughout this module we have detailed loads of different ways in which you can test your websites and apps, and explained the sort of scope your cross-browser testing efforts should have in terms of what browsers to test, accessibility considerations, and more. Sounds like a lot of work, doesn't it?
We agree — testing all the things we've looked at in previous articles manually can be a real pain. Fortunately, there are tools to help us automate some of this pain away. There are two main ways in which we can automate the tests we've been talking about in this module:
- Use a task runner such as Grunt or Gulp, or npm scripts to run tests and clean up code during your build process. This is a great way to perform tasks like linting and minifying code, adding in CSS prefixes or transpiling nascent JavaScript features for maximum cross-browser reach, and so on.
- Use a browser automation system like Selenium to run specific tests on installed browsers and return results, alerting you to failures in browsers as they crop up. Commercial cross-browser testing apps like Sauce Labs and BrowserStack are based on Selenium, but allow you to access their set up remotely using a simple interface, saving you the hassle of setting up your own testing system.
We will look at how to set up your own Selenium-based testing system in the next article. In this article, we'll look at how to set up a task runner, and use the basic functionality of commercial systems like the ones mentioned above.
Note: the above two categories are not mutually exclusive. It is possible to set up a task runner to access a service like Sauce Labs, or LambdaTest via an API, run cross browser tests, and return results. We will look at this below as well.
Using a task runner to automate testing tools
As we said above, you can drastically speed up common tasks such as linting and minifying code by using a task runner to run everything you need to run automatically at a certain point in your build process. For example, this could be every time you save a file, or at some other point. Inside this section we'll look at how to automate task running with Node and Gulp, a beginner-friendly option.
Setting up Node and npm
Most tools these days are based on Node.js, so you'll need to install it from nodejs.org:
- Download the installer for your system from the above site. (If you already have Node and npm installed, jump to point 4)
- Install it like you would any other program. Note that Node comes with Node Package Manager (npm), which allows you to easily install packages, share your own packages with others, and run useful scripts on your projects.
- Once the install completes, test that node is installed by typing the following into the terminal, which returns the installed versions of Node and npm:
bash
node -v npm -v - If you've got Node/npm already installed, you should update them to their latest versions. To update Node, the most reliable way is to download and install an updated installer package from their website (see link above). To update npm, use the following command in your terminal:
bash
npm install npm@latest -g
Note: If the above command fails with permissions errors, Fixing npm permissions should sort you out.
To start using Node/npm-based packages on your projects, you need to set up your project directories as npm projects. This is easy to do.
For example, let's first create a test directory to allow us to play without fear of breaking anything.
- Create a new directory somewhere sensible using your file manager UI, or, on a command line, by navigating to the location you want and running the following command:
bash
mkdir node-test - To make this directory an npm project, you just need to go inside your test directory and initialize it, with the following:
bash
cd node-test npm init - This second command will ask you many questions to find out the information required to set up the project; you can just select the defaults for now.
- Once all the questions have been asked, it will ask you if the information entered is OK. Type
yesand press Enter/Return and npm will generate apackage.jsonfile in your directory.
This file is basically a config file for the project. You can customize it later, but for now it'll look something like this:
{
  "name": "node-test",
  "version": "1.0.0",
  "description": "Test for npm projects",
  "main": "index.js",
  "scripts": {
    "test": "test"
  },
  "author": "Chris Mills",
  "license": "MIT"
}
With this, you are ready to move on.
Setting up Gulp automation
Let's look at setting up Gulp and using it to automate some testing tools.
-
To begin with, create a test npm project using the procedure detailed at the bottom of the previous section.
Also, update the
package.jsonfile with the line:"type": "module"so that it'll look something like this:json{ "name": "node-test", "version": "1.0.0", "description": "Test for npm projects", "main": "index.js", "scripts": { "test": "test" }, "author": "Chris Mills", "license": "MIT", "type": "module" } -
Next, you'll need some sample HTML, CSS and JavaScript content to test your system on — make copies of our sample index.html, main.js, and style.css files in a subfolder with the name
srcinside your project folder. You can try your own test content if you like, but bear in mind that such tools won't work on internal JS/CSS — you need external files. - First, install gulp globally (meaning, it will be available across all projects) using the following command:
bash
npm install --global gulp-cli - Next, run the following command inside your npm project directory root to set up gulp as a dependency of your project:
bash
npm install --save-dev gulp - Now create a new file inside your project directory called
gulpfile.mjs. This is the file that will run all our tasks. Inside this file, put the following:This requires thejsimport gulp from "gulp"; export default function (cb) { console.log("Gulp running"); cb(); }gulpmodule we installed earlier, and then exports a default task that does nothing except for printing a message to the terminal — this is useful for letting us know that Gulp is working. Each gulp task is exported in the same basic format —exports.taskName = taskFunction. Each function takes one parameter — a callback to run when the task is completed. - You can run your gulp's default task with the following command — try this now:
bash
gulp
Adding some real tasks to Gulp
To add some real tasks to Gulp, we need to think about what we want to do. A reasonable set of basic functionalities to run on our project is as follows:
- html-tidy, css-lint, and js-hint to lint and report/fix common HTML/CSS/JS errors (see gulp-htmltidy, gulp-csslint, gulp-jshint).
- Autoprefixer to scan our CSS and add vendor prefixes only where needed (see gulp-autoprefixer).
- babel to transpile any new JavaScript syntax features to traditional syntax that works in older browsers (see gulp-babel).
See the links above for full instructions on the different gulp packages we are using.
To use each plugin, you need to first install it via npm, then require any dependencies at the top of the gulpfile.js file, then add your test(s) to the bottom of it, and finally export the name of your task to be available via gulp's command.
html-tidy
- Install using the following line:
bash
npm install --save-dev gulp-htmltidyNote:
--save-devadds the package as a dependency to your project. If you look in your project'spackage.jsonfile, you'll see an entry for it in thedevDependenciesproperty. - Add the following dependency to
gulpfile.js:jsimport htmltidy from "gulp-htmltidy"; - Add the following test to the bottom of
gulpfile.js:jsexport function html() { return gulp .src("src/index.html") .pipe(htmltidy()) .pipe(gulp.dest("build")); } - Change the default export to:
js
export default html;
Here we are grabbing our development index.html file with gulp.src(), which allows us to grab a source file to do something with.
We next use the pipe() function to pass that source to another command to do something else with. We can chain as many of these together as we want. We first run htmltidy() on the source, which goes through and fixes errors in our file. The second pipe() function writes the output HTML file to the build directory.
In the input version of the file, you may have noticed that we put an empty <p> element; htmltidy has removed this by the time the output file has been created.
Autoprefixer and css-lint
- Install using the following lines:
bash
npm install --save-dev gulp-autoprefixer npm install --save-dev gulp-csslint - Add the following dependencies to
gulpfile.js:jsimport autoprefixer from "gulp-autoprefixer"; import csslint from "gulp-csslint"; - Add the following test to the bottom of
gulpfile.js:jsexport function css() { return gulp .src("src/style.css") .pipe(csslint()) .pipe(csslint.formatter("compact")) .pipe( autoprefixer({ cascade: false, }), ) .pipe(gulp.dest("build")); } - Add the following property to
package.json:json"browserslist": [ "last 5 versions" ] - Change the default task to:
js
export default gulp.series(html, css);
Here we grab our style.css file, run csslint on it (which outputs a list of any errors in your CSS to the terminal), then runs it through autoprefixer to add any prefixes needed to make nascent CSS features run in older browsers. At the end of the pipe chain, we output our modified prefixed CSS to the build directory. Note that this only works if csslint doesn't find any errors — try removing a curly brace from your CSS file and re-running gulp to see what output you get!
js-hint and babel
- Install using the following lines:
bash
npm install --save-dev gulp-babel @babel/preset-env npm install --save-dev @babel/core npm install jshint gulp-jshint --save-dev - Add the following dependencies to
gulpfile.js:jsimport babel from "gulp-babel"; import jshint from "gulp-jshint"; - Add the following test to the bottom of
gulpfile.js:jsexport function js() { return gulp .src("src/main.js") .pipe(jshint()) .pipe(jshint.reporter("default")) .pipe( babel({ presets: ["@babel/env"], }), ) .pipe(gulp.dest("build")); } - Change the default task to:
js
export default gulp.series(html, css, js);
Here we grab our main.js file, run jshint on it and output the results to the terminal using jshint.reporter; we then pass the file to babel, which converts it to old style syntax and outputs the result into the build directory. Our original code included a fat arrow function, which babel has modified into an old style function.
Further ideas
Once this is all set up, you can run the gulp command inside your project directory, and you should get an output like this:
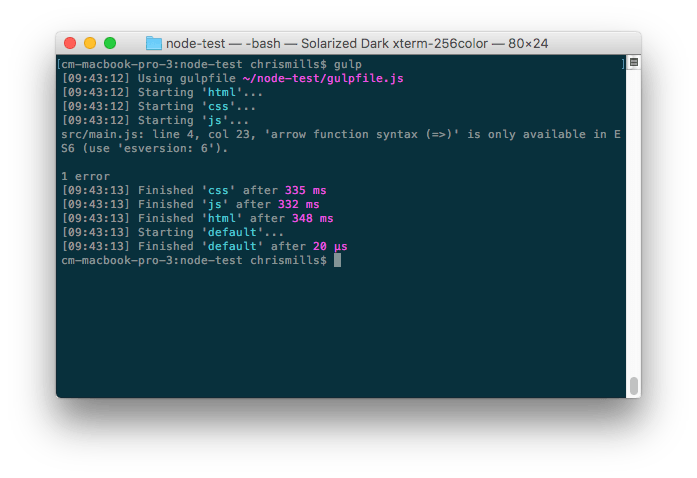
You can then try out the files output by your automated tasks by looking at them inside the build directory, and loading build/index.html in your web browser.
If you get errors, check that you've added all the dependencies and the tests as shown above; also try commenting out the HTML/CSS/JavaScript code sections and then rerunning gulp to see if you can isolate what the problem is.
Gulp comes with a watch() function that you can use to watch your files and run tests whenever you save a file. For example, try adding the following to the bottom of your gulpfile.js:
export function watch() {
  gulp.watch("src/*.html", html);
  gulp.watch("src/*.css", css);
  gulp.watch("src/*.js", js);
}
Now try entering the gulp watch command into your terminal. Gulp will now watch your directory, and run the appropriate tasks whenever you save a change to an HTML, CSS, or JavaScript file.
Note: The * character is a wildcard character — here we're saying "run these tasks when any files of these types are saved. You could also use wildcards in your main tasks, for example gulp.src('src/*.css') would grab all your CSS files and then run piped tasks on them.
There's a lot more you can do with Gulp. The Gulp plugin directory has literally thousands of plugins to search through.
Other task runners
There are many other task runners available. We certainly aren't trying to say that Gulp is the best solution out there, but it works for us and it is fairly accessible to beginners. You could also try using other solutions:
- Grunt works in a very similar way to Gulp, except that it relies on tasks specified in a config file, rather than using written JavaScript. See Getting started with Grunt for more details.
- You can also run tasks directly using npm scripts located inside your
package.jsonfile, without needing to install any kind of extra task runner system. This works on the premise that things like Gulp plugins are basically wrappers around command line tools. So, if you can work out how to run the tools using the command line, you can then run them using npm scripts. It is a bit trickier to work with, but can be rewarding for those who are strong with their command line skills. Why npm scripts? provides a good introduction with a good deal of further information.
Using commercial testing services to speed up browser testing
Now let's look at commercial third-party browser testing services and what they can do for us.
The basic premise with such applications is that the company that runs each one has a huge server farm that can run many different tests. When you use this service, you provide a URL of the page you want to test along with information, such as what browsers you want it tested in. The app then configures a new VM with the OS and browser you specified, and returns the test results in the form of screenshots, videos, log files, text, etc.
You can then step up a gear, using an API to access functionality programmatically, which means that such apps can be combined with task runners, such as your own local Selenium environments and others, to create automated tests.
Note: There are other commercial browser testing systems available but in this article, we'll focus on LambdaTest, Sauce Labs, and BrowserStack. We're not saying that these are necessarily the best tools available, but they are good ones that are simple for beginners to get up and running with.
LambdaTest
Getting started with LambdaTest
- Let's get started by signing up on LambdaTest for free.
- Sign in. This should happen automatically after you verify your email address.
Note: Unlike other cloud-based cross browser testing service providers, LambdaTest offers a freemium account where you get lifetime access to their platform. The only difference between their premium and their freemium plan is on the amount of consumption. For automation testing through their Selenium Grid, LambdaTest offers 60 minutes per month of free testing.
The basics: Manual tests
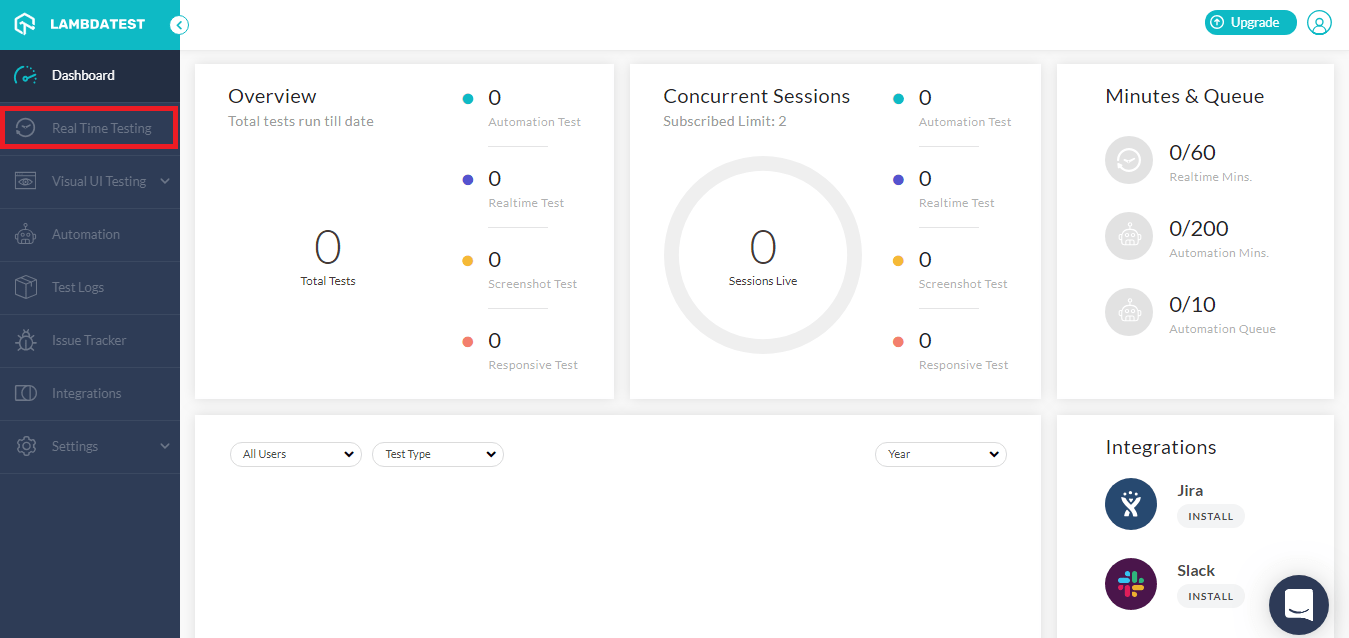
Once you sign in to LambdaTest, you will be routed to the LambdaTest Dashboard. The dashboard will provide you details related to how many minutes you have consumed, how many concurrent sessions are running, your total number of tests to date, and more.
-
To start off with manual testing you need to select the "Real Time Testing" tab from the left navigation menu.
-
As you click on the Real Time Testing you will be directed to a screen where you can choose the browser configuration, browser version, OS, and screen resolution with which you want to test your website.
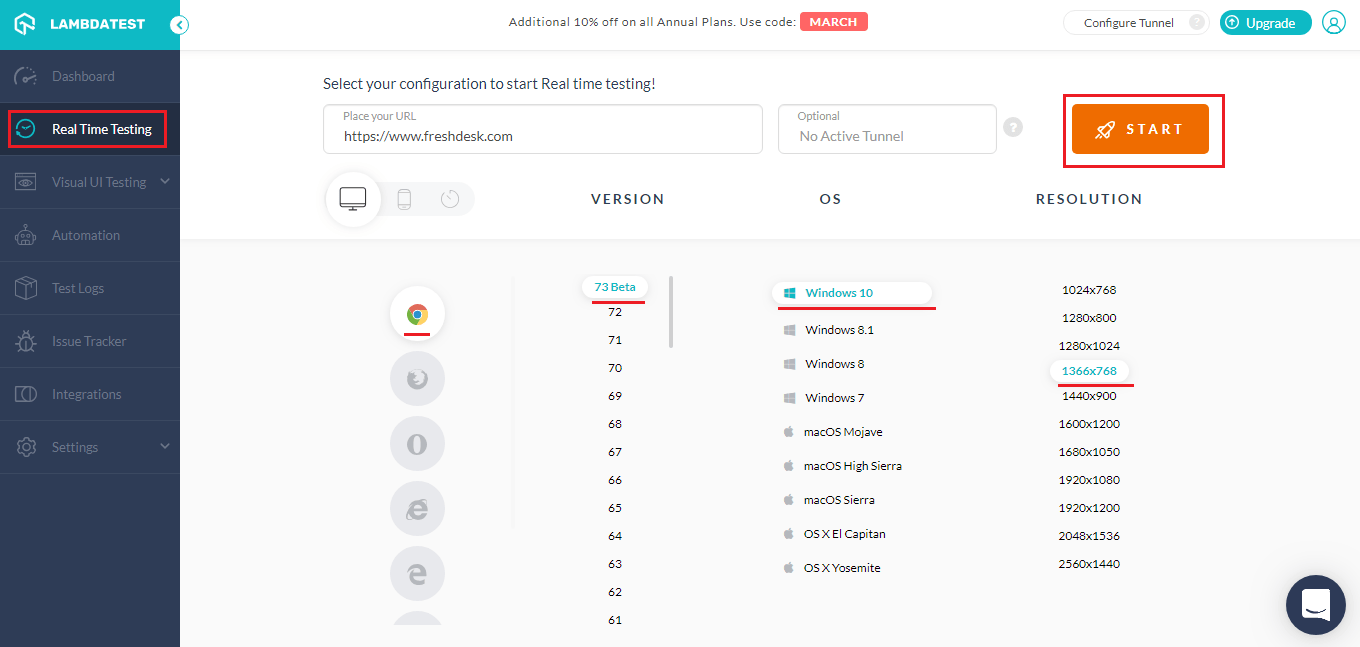
-
As you click on the Start button, a loading screen will appear, providing you with a VM (Virtual Machine) based on your configurations. Once loaded, you can perform live, interactive cross-browser testing with a website.
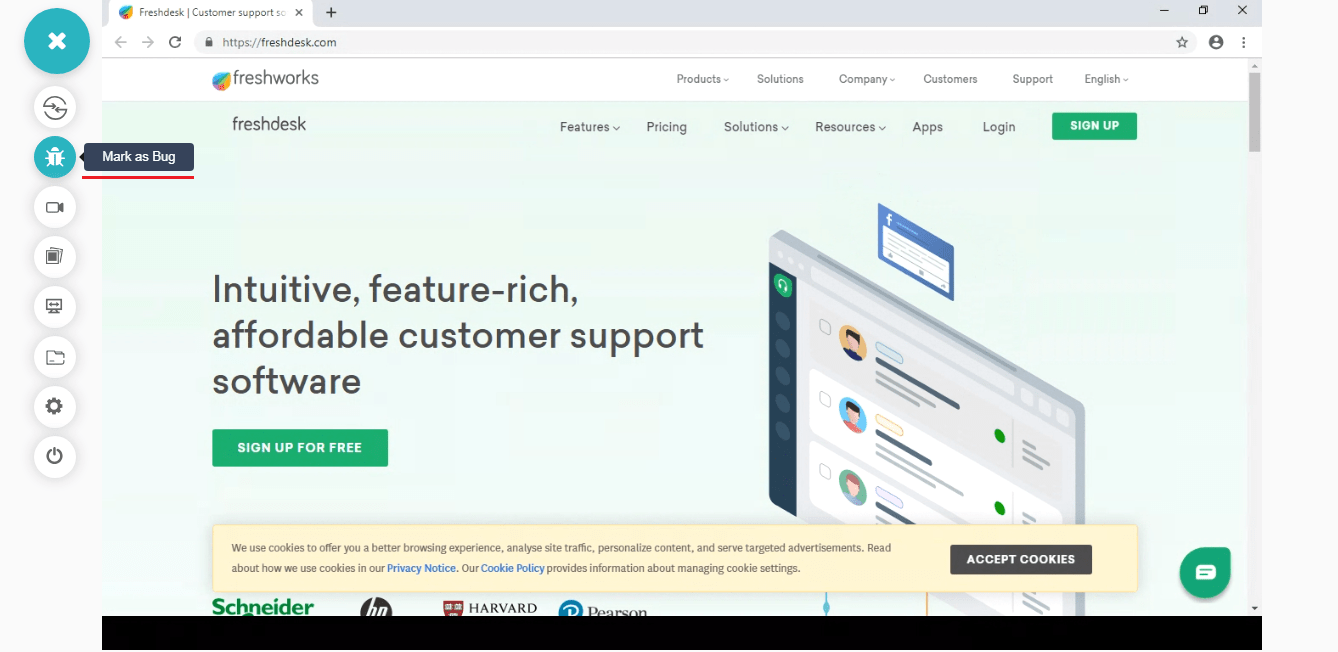 If you notice an issue with the UI, then you can share it with your colleagues by capturing a screenshot of your VM with the screenshot button. You can also record a video of your test session by hitting the recorder button in your test session.
- With the in-built image editor, highlight your screenshot before you push it to your colleagues.
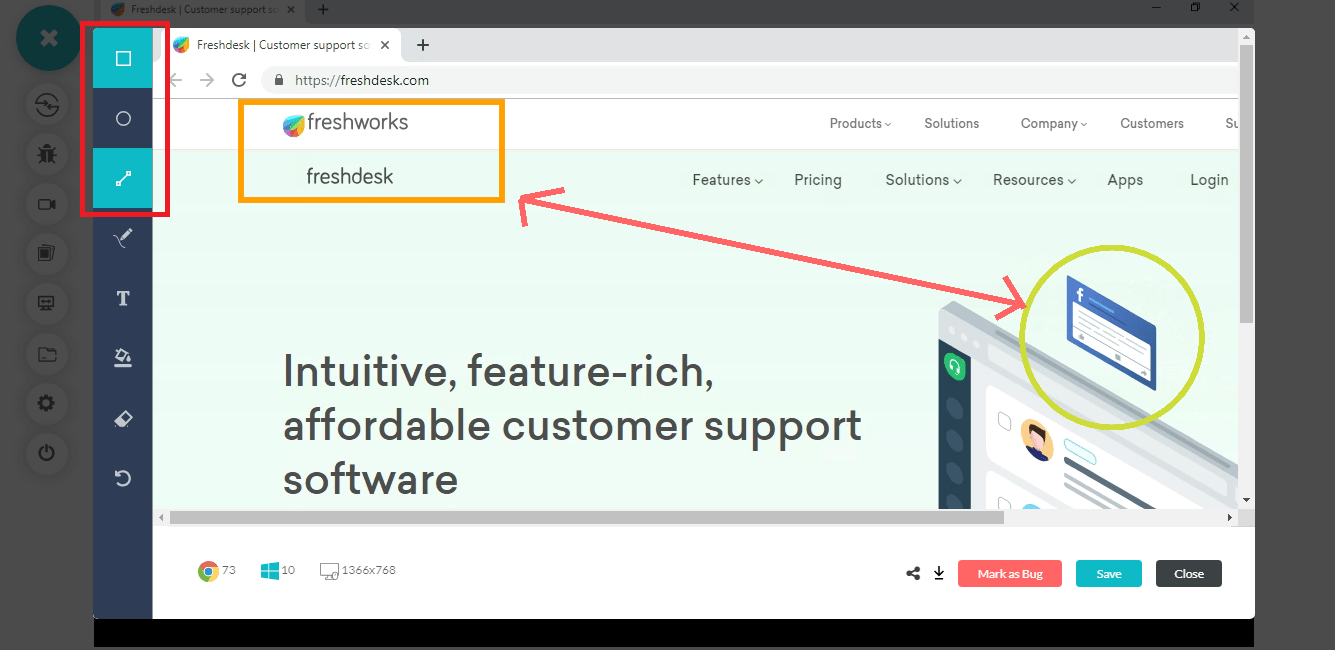
- Using the mark as bug button you can push bugs to numerous third-party tools such as Jira, Asana, Trello, and more. That way you can log a bug directly from your test session on LambdaTest to your project management instance. Check out all the third-party LambdaTest integrations.

Note: All the videos and images captured inside a test session are captured inside the gallery, test logs, and issue tracker at LambdaTest.
Sauce Labs
Getting started with Sauce Labs
Let's get started with a Sauce Labs Trial.
- Create a Sauce Labs trial account.
- Sign in. This should happen automatically after you verify your email address.
The basics: Manual tests
The Sauce Labs dashboard has a lot of options available on it. For now, make sure you are on the Manual Tests tab.
- Click Start a new manual session.
- In the next screen, type in the URL of a page you want to test (use https://mdn.github.io/learning-area/javascript/building-blocks/events/show-video-box-fixed.html, for example), then choose a browser/OS combination you want to test by using the different buttons and lists. There is a lot of choice, as you'll see!

- When you click Start session, a loading screen will then appear, which spins up a virtual machine running the combination you chose.
- When loading has finished, you can then start to remotely test the website running in the chosen browser.
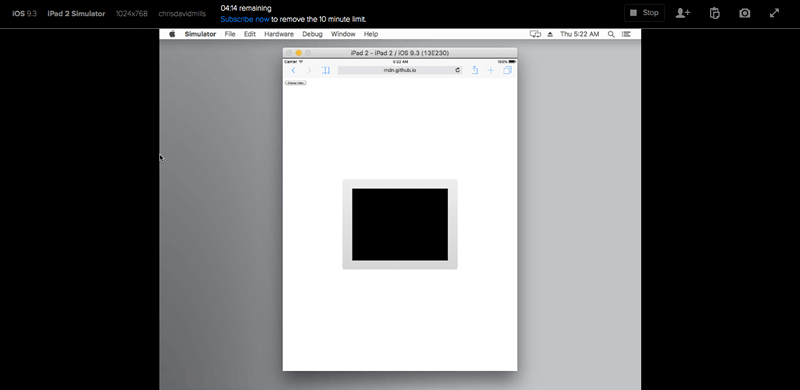
- From here you can see the layout as it would look in the browser you are testing, move the mouse around and try clicking buttons, etc. The top menu allows you to:
- Stop the session
- Give someone else a URL so they can observe the test remotely.
- Copy text/notes to a remote clipboard.
- Take a screenshot.
- Test in full screen mode.
Once you stop the session, you'll return to the Manual Tests tab, where you'll see an entry for each of the previous manual sessions you started. Clicking on one of these entries shows more data for the session. In here you can download any screenshots you took, watch a video of the session, view data logs, and more.
Note: This is already very useful, and way more convenient than having to set up all these emulators and virtual machines by yourself.
Advanced: The Sauce Labs API
Sauce Labs has a restful API that allows you to programmatically retrieve details of your account and existing tests, and annotate tests with further details, such as their pass/fail state which isn't recordable by manual testing alone. For example, you might want to run one of your own Selenium tests remotely using Sauce Labs to test a certain browser/OS combination, and then pass the test results back to Sauce Labs.
It has several clients available to allow you to make calls to the API using your favorite environment, be it PHP, Java, Node.js, etc.
Let's have a brief look at how we'd access the API using Node.js and node-saucelabs.
- First, set up a new npm project to test this out, as detailed in Setting up Node and npm. Use a different directory name than before, like
sauce-testfor example. - Install the Node Sauce Labs wrapper using the following command:
bash
npm install saucelabs - Create a new file inside your project root called
call_sauce.js. give it the following contents:jsconst SauceLabs = require("saucelabs").default; (async () => { const myAccount = new SauceLabs({ username: "your-sauce-username", password: "your-sauce-api-key", }); // Get full WebDriver URL from the client depending on region: console.log(myAccount.webdriverEndpoint); // Get job details of last run job const jobs = await myAccount.listJobs("your-sauce-username", { limit: 1, full: true, }); console.log(jobs); })(); - You'll need to fill in your Sauce Labs username and API key in the indicated places. These can be retrieved from your User Settings page. Fill these in now.
- Make sure everything is saved, and run your file like so:
bash
node call_sauce
Advanced: Automated tests
We'll cover actually running automated Sauce Lab tests in the next article.
BrowserStack
Getting started with BrowserStack
Let's get started with a BrowserStack Trial.
- Create a BrowserStack trial account.
- Sign in. This should happen automatically after you verify your email address.
- When you first sign in, you should be on the Live testing page; if not, click the Live link in the top nav menu.
- If you are on Firefox or Chrome, you'll be prompted to Install a browser extension in a dialog titled "Enable Local Testing" — click the Install button to proceed. On other browsers you'll still be able to use some of the features (generally via Flash), but you might not get the full experience.
The basics: Manual tests
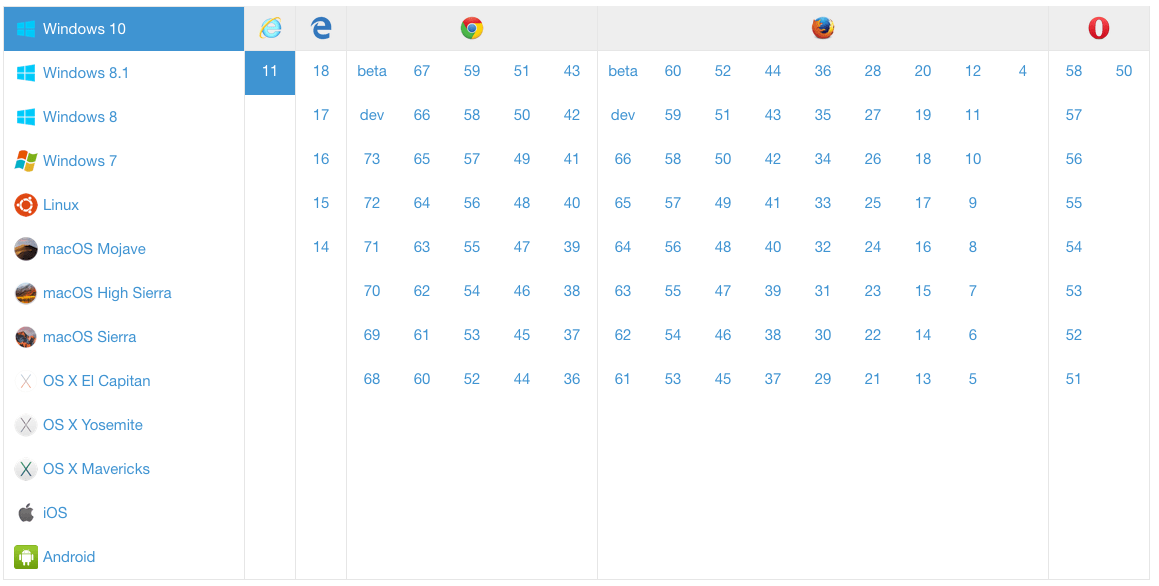
The BrowserStack Live dashboard allows you to choose what device and browser you want to test on — Platforms in the left column, devices on the right. When you mouse over or click on each device, you get a choice of browsers available on that device.
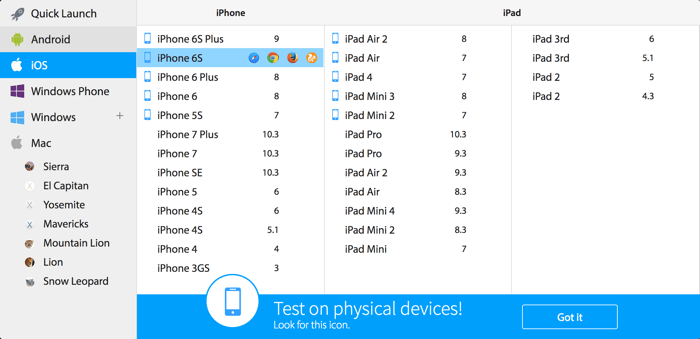
Clicking on one of those browser icons will load up your choice of platform/device/browser — choose one now, and give it a try.
Note: The blue device icon next to some of the mobile device choices signals that you will be testing on a real device; choices without that icon will be run on an emulator.
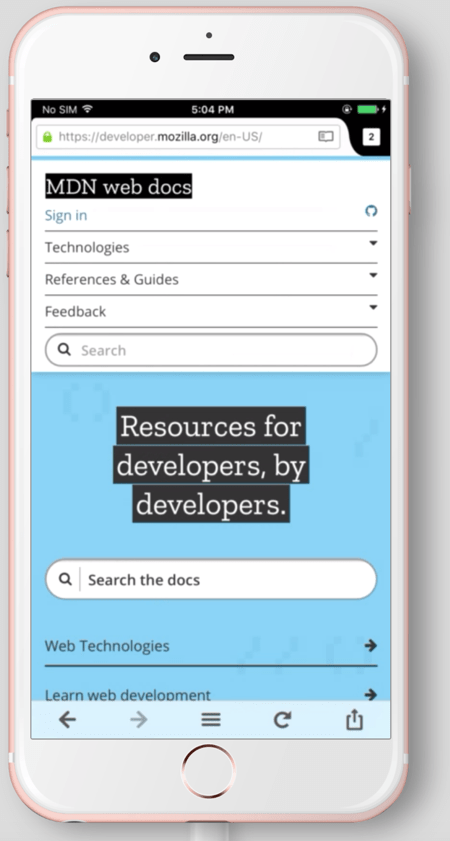
You'll find that you can enter URLs into the address bar, and use the other controls like you'd expect on a real device. You can even do things like copy and paste from the device to your clipboard, scroll up and down by dragging with the mouse, or use appropriate gestures (e.g. pinch/zoom, two fingers to scroll) on the touchpads of supporting devices (e.g. MacBook). Note that not all features are available on all devices.
You'll also see a menu that allows you to control the session.
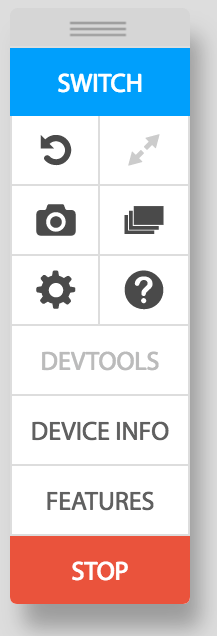
The features here are as follows:
- Switch — Change to another platform/device/browser combination.
- Orientation (looks like a Reload icon) — Switch orientation between portrait and landscape.
- Fit to screen (looks like a full screen icon) — Fill the testing areas as much as possible with the device.
- Capture a bug (looks like a camera) — Takes a screenshot, then allows you to annotate and save it.
- Issue tracker (looks like a deck of cards) — View previously captured bugs/screenshots.
- Settings (cog icon) — Allows you to alter general settings for the session.
- Help (question mark) — Accesses help/support functions.
- Devtools — Allows you to use your browser's devtools to directly debug or manipulate the page being shown in the test browser. This currently only works when testing the Safari browser on iOS devices.
- Device info — Displays information about the testing device.
- Features — Shows you what features the current configuration supports, e.g. copy to clipboard, gesture support, etc.
- Stop — Ends the session.
Note: This is already very useful, and way more convenient than having to set up all these emulators and virtual machines by yourself.
Other basic features
If you go back to the main BrowserStack page, you'll find a couple of other useful basic features under the More menu option:
- Responsive: Enter a URL and press Generate, and BrowserStack will load that URL on multiple devices with different viewport sizes. Within each device you can further adjust settings like monitor size, to get a good idea of how your site's layout works across different form factors.
- Screenshots: Enter a URL, choose the browsers/devices/platforms you are interested in, then press Generate screenshots — BrowserStack will take screenshots of your site in all those different browsers then make them available to you to view and download.
Advanced: The BrowserStack API
BrowserStack also has a restful API that allows you to programmatically retrieve details of your account plan, sessions, builds, etc.
It has several clients available to allow you to make calls to the API using your favorite environment, be it PHP, Java, Node.js, etc.
Let's have a brief look at how we'd access the API using Node.js.
- First, set up a new npm project to test this out, as detailed in Setting up Node and npm. Use a different directory name than before, like
bstack-testfor example. - Create a new file inside your project root called
call_bstack.js. give it the following contents:jsconst request = require("request"); const bsUser = "BROWSERSTACK_USERNAME"; const bsKey = "BROWSERSTACK_ACCESS_KEY"; const baseUrl = `https://${bsUser}:${bsKey}@www.browserstack.com/automate/`; function getPlanDetails() { request({ uri: `${baseUrl}plan.json` }, (err, res, body) => { console.log(JSON.parse(body)); }); /* Response: { automate_plan: <string>, parallel_sessions_running: <int>, team_parallel_sessions_max_allowed: <int>, parallel_sessions_max_allowed: <int>, queued_sessions: <int>, queued_sessions_max_allowed: <int> } */ } getPlanDetails(); - You'll need to fill in your BrowserStack username and API key in the indicated places. These can be retrieved from your BrowserStack Account & Profile Details, under the Authentication & Security section. Fill these in now.
- Make sure everything is saved, and run your file like so:
bash
node call_bstack
Below we've also provided some other ready-made functions you might find useful when working with the BrowserStack restful API.
function getBuilds() {
  request({ uri: `${baseUrl}builds.json` }, (err, res, body) => {
    console.log(JSON.parse(body));
  });
  /* Response:
  [
    {
      automation_build: {
        name: <string>,
        duration: <int>,
        status: <string>,
        hashed_id: <string>
      }
    },
    {
      automation_build: {
        name: <string>,
        duration: <int>,
        status: <string>,
        hashed_id: <string>
      }
    },
    // …
  ]
  */
}

function getSessionsInBuild(build) {
  const buildId = build.automation_build.hashed_id;
  request(
    { uri: `${baseUrl}builds/${buildId}/sessions.json` },
    (err, res, body) => {
      console.log(JSON.parse(body));
    },
  );
  /* Response:
  [
    {
      automation_session: {
        name: <string>,
        duration: <int>,
        os: <string>,
        os_version: <string>,
        browser_version: <string>,
        browser: <string>,
        device: <string>,
        status: <string>,
        hashed_id: <string>,
        reason: <string>,
        build_name: <string>,
        project_name: <string>,
        logs: <string>,
        browser_url: <string>,
        public_url: <string>,
        video_url: <string>,
        browser_console_logs_url: <string>,
        har_logs_url: <string>
      }
    },
    // …
  ]
  */
}

function getSessionDetails(session) {
  const sessionId = session.automation_session.hashed_id;
  request({ uri: `${baseUrl}sessions/${sessionId}.json` }, (err, res, body) => {
    console.log(JSON.parse(body));
  });
  /* Response:
  {
    automation_session: {
      name: <string>,
      duration: <int>,
      os: <string>,
      os_version: <string>,
      browser_version: <string>,
      browser: <string>,
      device: <string>,
      status: <string>,
      hashed_id: <string>,
      reason: <string>,
      build_name: <string>,
      project_name: <string>,
      logs: <string>,
      browser_url: <string>,
      public_url: <string>,
      video_url: <string>,
      browser_console_logs_url: <string>,
      har_logs_url: <string>
    }
  }
  */
}
Advanced: Automated tests
We'll cover actually running automated BrowserStack tests in the next article.
TestingBot
Getting started with TestingBot
Let's get started with a TestingBot Trial.
- Create a TestingBot trial account.
- Sign in. This should happen automatically after you verify your email address.
The basics: Manual tests
The TestingBot dashboard lists the various options you can choose from. For now, make sure you are on the Live Web Testing tab.
- Enter the URL of the page you want to test.
-
Choose the browser/OS combination you want to test by selecting the combination in the grid.
- When you click Start Browser, a loading screen will then appear, which spins up a virtual machine running the combination you chose.
- When loading has finished, you can then start to remotely test the website running in the chosen browser.
- From here you can see the layout as it would look in the browser you are testing, move the mouse around and try clicking buttons, etc. The side menu allows you to:
- Stop the session
- Change the screen resolution
- Copy text/notes to a remote clipboard
- Take, edit, and download screenshots
- Test in full screen mode.
Once you stop the session, you'll return to the Live Web Testing page, where you'll see an entry for each of the previous manual sessions you started. Clicking on one of these entries shows more data for the session. Here you can download any screenshots you took, watch a video of the test, and view logs for the session.
Advanced: The TestingBot API
TestingBot has a restful API that allows you to programmatically retrieve details of your account and existing tests, and annotate tests with further details, such as their pass/fail state which isn't recordable by manual testing alone.
TestingBot has several API clients you can use to interact with the API, including clients for NodeJS, Python, Ruby, Java and PHP.
Below is an example on how to interact with the TestingBot API with the NodeJS client testingbot-api.
- First, set up a new npm project to test this out, as detailed in Setting up Node and npm. Use a different directory name than before, like
tb-testfor example. - Install the Node TestingBot wrapper using the following command:
bash
npm install testingbot-api - Create a new file inside your project root called
tb.js. give it the following contents:jsconst TestingBot = require("testingbot-api"); let tb = new TestingBot({ api_key: "your-tb-key", api_secret: "your-tb-secret", }); tb.getTests(function (err, tests) { console.log(tests); }); - You'll need to fill in your TestingBot Key and Secret in the indicated places. You can find these in the TestingBot dashboard.
- Make sure everything is saved, and run the file:
bash
node tb.js
Advanced: Automated tests
We'll cover actually running automated TestingBot tests in the next article.
Summary
This was quite a ride, but I'm sure you can start to see the benefits of using automation tools to do some of the heavy lifting in terms of testing.
In the next article, we'll look at setting up our own local automation system using Selenium, and how to combine that with services such as Sauce Labs, BrowserStack and TestingBot.