
Migrating from GitHub to GitLab seamlessly: A step-by-step guide
If you've been using one of the many CI/CD tools and are now considering a switch to GitLab, you might be wondering about the difficulty of the migration process. Migration is usually a concern for DevSecOps teams when evaluating a new solution. This is because migrating from one system to the other can involve substantial effort, complexities, and a steep learning curve. We're here to tell you that migrating to GitLab's AI-powered DevSecOps Platform is extremely straightforward.
In this post, we will guide you through the process step by step. We will go over how to migrate from GitHub to GitLab using our project import functionality. We'll also explain how to manually transfer GitHub Actions to GitLab pipelines.
What data can be migrated from GitHub to GitLab?
GitLab's built-in importer allows for GitHub projects to be migrated automatically into GitLab. You can access this built-in importer directly from GitLab's project creation UI. In the UI, you can select the data you wish to migrate to GitLab. The following data can be migrated:
- Repository description
- Git repository data
- Branch protection rules
- Collaborators (members)
- Issues
- Pull requests
- Wiki pages
- Milestones
- Labels
- Release notes content
- Release notes attachments
- Comment attachments
- Issue description attachments
- Pull request description attachments
- Pull request review comments
- Regular issue and pull request comments
- Git Large File Storage (LFS) objects
- Pull request reviews
- Pull request assigned reviewers
- Pull request "merged by" information
- Pull request comments replies in discussions
- Pull request review comments suggestions
- Issue and pull requests events
GitHub and GitLab use different terminologies for the same concept, so a mapping must be performed during the migration. For example, when collaborators or members are migrated, permissions from GitHub are mapped to the appropriate GitLab roles as follows:
| GitHub Role | GitLab Role |
|---|---|
| Read | Guest |
| Triage | Reporter |
| Write | Developer |
| Maintain | Maintainer |
| Admin | Owner |
Here's how some terms in GitHub are referred to in GitLab:
| GitHub Term | GitLab Term |
|---|---|
| Pull request | Merge request |
| Actions | Pipeline |
Prerequisites for migrating data to GitLab
Now that you know what can be imported, let's review the prerequisites for performing the migration. With the GitLab importer, you can import your projects from "GitHub.com" or "GitHub Enterprise" to either "GitLab.com" or "Self-managed GitLab" if you meet the following requirements:
- You must be a Maintainer on the GitLab destination group to which you are importing from GitHub.
- Every GitHub author and assignee in the repository must have a public-facing email address on GitHub, which should match their GitLab email address.
- GitHub accounts must have a public-facing email address.
- The GitHub import source must be enabled on GitLab (only in self-managed GitLab).
When migrating a user, GitLab uses the public-facing email address in GitHub to verify the user with the same email on GitLab. Since email ownership is unique, GitLab verification helps to confirm that you have set up a valid user with valid permissions.
Importing data from GitHub into GitLab
Let's go over how to perform the migration.
I will be migrating my project, the Reddit sentiment analyzer, from GitHub to GitLab. The Reddit sentiment analyzer contains a pull request (called a merge request in GitLab), issues, and comments.
Note: While you may not have permissions to my project, the step-by-step process applies to any project you own. I am using my project so you can see how I migrate GitHub Actions in the next section.
- Create a project in GitLab by using the Project Creation Interface.
-
Select the "Import project" box. This allows you to migrate data from external sources.

- Under "Import project from", click the "GitHub" button. This will take you to the "Authenticate with GitHub" page.
-
Click the "Authenticate with GitHub" button. You can also specify a Personal Access Token from GitHub with the "repo scope" if you prefer. This will take you to the GitHub authorization app.
On the "Authorize GitLab.com" page, you can grant access to GitHub organization(s) where the projects you wish to migrate are located.

- Click the "Grant" button for the organization where the project you wish to migrate is stored.
- Click the "Authorize gitlabhq" button to grant GitLab access to the organization(s) selected. You will then be taken to the import selection page.
-
From here, you can select the items you wish to import.

Note: The more items you choose to migrate, the longer the import will take.
-
Next, set the GitLab location where you want to migrate the GitHub project.

- Click the "Import" button, and the import process will begin. You can see the progress in the UI. Once the import is complete, the status will change to "Complete".
You should now have the imported project in your workspace. For example, mine is located at https://gitlab.com/awkwardferny/reddit-sentiment-analyzer.
When examining the imported project, you will see the following on GitLab:
-
After the repository has been migrated

-
After issues have been migrated

-
After merge requests have been migrated

Migrating GitHub Actions to GitLab CI/CD
After migrating the project from GitHub, you'll notice that none of the GitHub Actions are running. Don't worry; migrating them manually is a straightforward process. Let's start the migration process for GitHub Actions.
- Examine GitHub Actions within the
.github/workflowsfolder. In the project you just imported, you should see three Action files:lint.yml,smoke.yml, andunit.yml. Let's go over the details of these files.lint.yml: This file contains the Action that performs linting on the source code using flake8. This action uses thepython:3.10Docker image and installs the application requirements before performing the lint.yamlname: "Lint" on: push: branches: [master] pull_request: branches: [master] jobs: lint: runs-on: ubuntu-latest steps: - uses: actions/checkout@v3 - name: Set up Python 3.10 uses: actions/setup-python@v4 with: python-version: "3.10" - name: Install dependencies run: | python -m pip install --upgrade pip pip install flake8 pytest if [ -f requirements.txt ]; then pip install -r requirements.txt; fi - name: Lint with flake8 run: | # stop the build if there are Python syntax errors or undefined names flake8 . --count --select=E9,F63,F7,F82 --show-source --statistics # exit-zero treats all errors as warnings. The GitHub editor is 127 chars wide flake8 . --count --exit-zero --max-complexity=10 --max-line-length=127 --statisticssmoke.yml: This file contains the Action that performs a smoke test by running the CLI help menu. It uses thepython:3.10Docker image and installs the application requirements before performing the smoke test.yamlname: "Smoke Tests" on: push: branches: [master] pull_request: branches: [master] jobs: smoke-tests: runs-on: ubuntu-latest steps: - uses: actions/checkout@v3 - name: Set up Python 3.10 uses: actions/setup-python@v4 with: python-version: "3.10" - name: Install dependencies run: | python -m pip install --upgrade pip pip install setuptools if [ -f requirements.txt ]; then pip install -r requirements.txt; fi - name: Install Sentiment Analysis Application run: | python setup.py install - name: Run smoke tests run: | reddit-sentiment --helpunit.yml: This file contains the Action that performs unit tests using pytest. It uses thepython:3.10Docker image and installs the application requirements running the unit tests.Let's migrate these Actions to GitLab.yamlname: "Unit Tests" on: push: branches: [master] pull_request: branches: [master] jobs: unit-tests: runs-on: ubuntu-latest steps: - uses: actions/checkout@v3 - name: Set up Python 3.10 uses: actions/setup-python@v4 with: python-version: "3.10" - name: Install dependencies run: | python -m pip install --upgrade pip pip install pytest if [ -f requirements.txt ]; then pip install -r requirements.txt; fi - name: Test with pytest run: | python -m pip install --upgrade pip if [ -f test-requirements.txt ]; then pip install -r test-requirements.txt; fi pytest tests/
- Go to the recently imported project on GitLab and open the Web IDE.
- Create a file called
.gitlab-ci.ymlat the root. This file defines the GitLab pipeline. - Add the following configuration, which will add the GitHub Actions as Jobs in the GitLab pipeline. Notice the comments describing each section.
You can see that the scripts executed in GitLab match those in the GitHub Actions. The main difference is in the syntax used to set up the jobs and stages. To learn more on how to create and configure pipelines, check out the GitLab CI/CD documentation.yaml
# This creates the stages in which the jobs will run. By default, all # jobs will run in parallel in the stage. Once the jobs are completed # successfully, you move on to the next stage. The way jobs run # is completely configurable. stages: - test # With the include statement, you can quickly add jobs that have # been pre-defined in external YAML files. The SAST job I've included below # is provided and maintained by GitLab and adds Static Application # Security Testing (SAST) to your pipeline. include: - template: Jobs/SAST.gitlab-ci.yml # This is the unit test job that does exactly what is defined in # the GitHub Action in unit.yml. You can see it uses the python:3.10 # Docker image, installs the application dependencies, and then runs # the unit tests with pytest. It was added with a simple copy and # paste and minor syntax changes. unit: image: python:3.10 stage: test before_script: - python -m pip install --upgrade pip - pip install pytest - if [ -f requirements.txt ]; then pip install -r requirements.txt; fi script: - pytest tests/ # This is the lint job that does exactly what is defined in the # GitHub Action in lint.yml. You can see it uses the python:3.10 # Docker image, installs the application dependencies, and then # performs the linting with flake8. It was added with a simple copy # and paste and minor syntax changes. lint: image: python:3.10 stage: test before_script: - python -m pip install --upgrade pip - pip install flake8 - if [ -f requirements.txt ]; then pip install -r requirements.txt; fi script: - flake8 . --count --select=E9,F63,F7,F82 --show-source --statistics - flake8 . --count --exit-zero --max-complexity=10 --max-line-length=127 --statistics # This is the smoke test job that does exactly what is defined in # the GitHub Action in smoke.yml. You can see it uses the python:3.10 # Docker image, installs the application dependencies, and then runs # the smoke tests with the Reddit sentiment analysis CLI. It was # added with a simple copy and paste and minor syntax changes. smoke: image: python:3.10 stage: test before_script: - python -m pip install --upgrade pip - pip install setuptools - if [ -f requirements.txt ]; then pip install -r requirements.txt; fi - python setup.py install script: - reddit-sentiment --help - Let's check the code in. In the Web IDE, click on the "Source Control" tab, which is the third icon from the top in the side panel. Then click the "Commit" button, select "Continue", and voila, you should now have a running pipeline.
-
Examine the pipeline and make sure the jobs are running properly. Go back to your project, and click on the pipeline icon. You can see the four jobs we created have run.
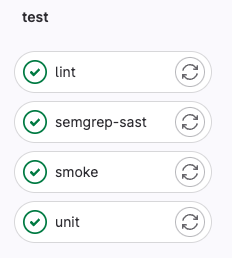
- Click the "unit" job, and you'll see that the unit tests were run successfully.
 $ pytest tests/
 ============================= test session starts ==============================
 platform linux -- Python 3.10.11, pytest-7.3.1, pluggy-1.0.0
 rootdir: /builds/awkwardferny/reddit-sentiment-analyzer
 collected 2 items
 tests/test_scraper.py ..                                                 [100%]
 ============================== 2 passed in 0.09s ===============================
 Cleaning up project directory and file based variables
 00:00
 Job succeeded
Summary
Migrating a project from GitHub to GitLab can initially appear challenging. However, as this guide demonstrated, the process is far from complex. With proper planning and following the steps outlined, transitioning to GitLab's platform can be smooth and straightforward.
This is a sponsored article by GitLab. GitLab is a comprehensive web-based DevSecOps platform providing Git-repository management, issue-tracking, continuous integration, and deployment pipeline features. Available in both open-source and proprietary versions, it's designed to cover the entire DevOps lifecycle, making it a popular choice for teams looking for a single platform to manage both code and operational data.